
Manual and User Guide


15
OVERLAY DRAWER PANEL INSTALLATION
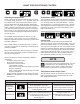
Step 3: Attach the Overlay Panel to the Drawer
1. Set the overlay panel on drawer front face and align
edges. (See Figure 18). The custom overlay panel
should be ush with the top of the drawer and centered
on the width of the drawer. Clamp panel in position and
mark pilot hole locations. Pick the required pilot hole
size from "Table A" below and drill the pilot holes ensur-
ing not to drill all the way through the overlay panel.
Table A: Pilot Hole Drill Sizes for Wood Screws
Material Type #8 Wood Screw
Hardwood
1
⁄8 Diameter Pilot Hole
Softwood
7
⁄64 Diameter Pilot Hole
2. Insert wood screws through clearance holes and
tighten to secure overlay panel.
3. Reinstall gasket into channel. Make sure the corners
are fully inserted.
4. Place the drawer divider back into the top drawer.
Step 4: Reinstall the Drawers
1. Fully extend drawer slides and place drawer on slides.
Be sure that drawer sits evenly on both slides and clips
slide into place in rear of drawer.
2. Re-install wire harness at rear corner of top drawer.
3. Re-install two screws through drawer into slides.
Cut the overlay panel to the dimensions shown below in
Figure 17. On the top drawer only drill the 2 counter-bored
holes which are clearance for screw heads on the face of
the top drawer.
This is also a convenient time to locate and drill the holes
for your handle. Most often the handle is to match that of
the surrounding cabinetry. If your handle attaches from the
back-side of the custom panel, locate the mounting holes
while the panel is attached to the drawer and cabinet. After
the panel is removed from the drawer, drill the mounting
holes from the front, to the recommended diameter of the
handle manufacturer. Counter bore the back-side of the
panel so the screw heads do not interfere with the surface
of the drawer.
Figure 18
Overlay panel
ush with top
edge of drawer
Using clearance holes in
gasket channel mark
hole locations onto panel
Screw clearance
hole through
gasket extrusion
Step 2: Size the Overlay Panel
Panel thickness
23
3
⁄4"
(603 mm)
Figure 17
Face of
Overlay Panel
(This side facing interior)
Figure 18a
14
29
⁄32"
(379 mm)
19"
(483 mm)
2
3
⁄8"
(60 mm)
1
3
⁄16" (30 mm)
1"(25 mm) diameter counter
bore
1
⁄4" (6 mm) deep
2 places, top drawer only.
Custom overlay
panel to be cen-
tered on width of
drawer.
Figure 16
.35/.31
(9 mm/7.5 mm)
.50
(12.5)