
Owner Manual

18
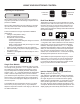
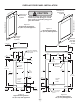
Loading Tips and Suggestions
Your appliance is equipped with a rollout shelf system
which provides maximum access and visibility for the prod-
uct stored on the shelving arrangements listed below.
Single Zone Wine Cellar:
24" (61 cm) Wide models:
(1) 8 bottle tray shelf with vibration dampening mat
(2) 7 bottle rollout display rack
(1) 5 bottle rollout display rack with vibration dampening
mat
Single Zone Wine Cellar:
15" (38.1 cm) Wide models:
(6) 4 bottle tray shelf with vibration dampening mat
Figure 24
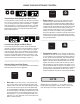
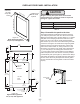
Step 6: Secure the cabinet
Use the #8 x
3
⁄4" black screws from the literature pack to
secure the counter top to the cabinet top through the holes
in the cabinet "Z" bracket.
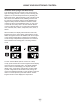
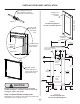
Step 5: Install the door
Carefully open the top and bottom hinges on the door being
careful as there are many pinch points. Place the hinges
over the 4 screws in the cabinet, 2 at the top and 2 at the
bottom and slide the door into position. Tighten the 4 hinge
screws with a phillips screwdriver. (See Figures 10 and
10a). Place wire harness from the grille and mount to the
bottom of the door with the screw and "P" clamp removed
in step 1. (See Figure 10b). Reconnect the wire harness,
(See Figure 11).
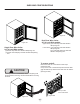
Figure 22
Cabinet
"Z" bracket
#8 x
3
⁄4" black
screws
(3 places)
OVERLAY DOOR PANEL INSTALLATION AND SHELVING CONFIGURATIONS
Figure 23