
Use and Care Guide


7
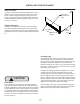
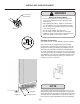
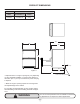
INSTALLING THE ANTI TIP DEVICE FOR FREESTANDING INSTALLATIONS
AND ENERGY SAVING TIPS
21
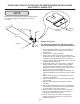
1
⁄2"
(54.6 cm)
"V" notches
in bracket
"V" notches
in bracket
Figure 8
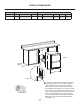
Rear of cabinet line
Figure 8a
Side of cabinet line
Front of cabinet line
Screw
Rear Leveling leg
NOTE
When the oor mounted anti-tip bracket is used the mini-
mum adjusted height of the cabinet is increased by
3
⁄8" (9 mm).
The following suggestions will minimize the
cost of operating your refrigeration appliance.
1. Do not install your appliance next to a hot appliance
(cooker, dishwasher, etc.), heating air duct, or other
heat sources.
2. Install product out of direct sunlight.
3. Ensure the front grille vents at front of appliance be-
neath drawer are not obstructed and kept clean to allow
ventilation for the refrigeration system to expel heat.
4. Plug your appliance into a dedicated power circuit. (Not
shared with other appliances).
5. When initially loading your new product, or whenever
large quantities of warm contents are placed within
refrigerated storage compartment, minimize drawer
openings for the next 12 hours to allow contents to pull
down to compartment set temperature.
6. Maintaining a relatively full storage compartment will
require less appliance run time than an empty compart-
ment.
7. Ensure drawer closing is not obstructed by contents
stored in your appliance.
8. Allow hot items to reach room temperature before plac-
ing in product.
9. Minimize drawer openings and duration of drawer
openings.
10. Use the warmest temperature control set temperature
that meets your personal preference and provides the
proper storage for your stored contents.
11. When on vacation or away from home for extended
periods, set the appliance to warmest acceptable
temperature for the stored contents.
12. Set the control to the “off” position if cleaning the
appliance requires the drawer to be open for an ex-
tended period of time.
Energy saving tips: