
Manual


70
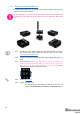
- Put DIP switch into Power = ON, DFU = ON (DIP switch
in Mini-RX and Mini-TX situated inside the body. To
switch it, carefully disassemble the body)
- Connect the beacon via USB to your PC
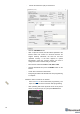
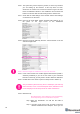
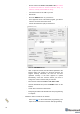
- Run DfuSe
- Press the RESET button on your beacon
- In the upper left corner of the DfuSe program, you will see
a device connected in the DFU mode
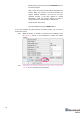
- Choose the DFU driver (file) for the beacon
- Click the UPGRADE button
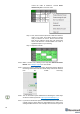
- After a couple of seconds, the DFU will be uploaded to the
beacon. Make sure it takes 1–3 seconds and does not
happen instantly. Otherwise, the SW has not been
uploaded correctly. If the DFU appears to upload
immediately, check the "Choose" button you used or
change the version of DfuSe SW you selected
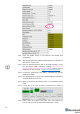
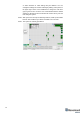
- Move the DIP switch into Power = ON, DFU = OFF
- Start the Dashboard and press the RESET button on the
beacon
- Check SW on the beacon afterwards
- Everything should be OK with SW now. DFU programming
is complete
- Follow the same scenario for the modem:
- Here is the link for the modem DFU programming. The
steps are similar to those for beacon DFU programming