SWITCHING-DIVERSITY WIRELESS MICROPHONE SYSTEM
1. Introduction............................................................................. 1.1 1.2 1.3 1.4 1 FCC Statement Safety Environment Wireless Note 2. System Feature........................................................................ 2 3. Product Description.................................................................. 3 3.1 Receiver 3.2 Handheld Microphone 3.3 Bodypack transmitter 4. Set Up......................................................................................
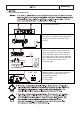
WIRELESS WIRELESS NOTE 1. Introduction Thank you for purchasing our product. This PLL synthesized wireless microphone system operates in UHF band frequency with 16 selectable channels. Please read this instruction manual carefully before operating the system. This manual covers the function and operation of the wireless microphone system. 1.1 FCC Statement This device complies with part 15 of the FCC rules.
SYSTEM FEATURES 2. System Features ¾ Carrier Frequency Range: UHF 520 ~ 930MHz ¾ Switching-Diversity technology and adjustable squelch ensures the reception quality. ¾ Auto-Scan function can locate the interference-free channel easily. ¾ Low noise mixer circuitry helps to reduce the noise from interference to a minimum. ¾ Clear status display including RF, AF and channel presence LED. ¾ Durable plastic chassis with 1/2 rack design. ¾ Balanced XLR connector and unbalanced 1/ 4'' jack audio outputs.
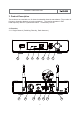
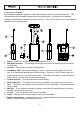
PRODUCT DESCRIPTION 3. Product Description The receivers are used with our 16 channel selectable channels transmitters. (The number of frequency channels depends on local regulations.) The receiver operates ! in UHF band frequency with PLL synthesized control. Powered by 12V DC. 3.1 Receiver 3.1.
2. Button △▽: Used to select your desired mode, and search channel forward. 3. Set Button: Press for 2 seconds. When the LED display is flashing to change the CH. Release the Set button then LED display flashing five times to lock the setting. 4. LED Display: Showing the channel number. 5. RF indicator: When it receives the signal, the LED will be red light. 6. AF Indicator: When it receives the signal, the LED will be green light. 7. 8. Fixed-length UHF antenna permanently mounted. 9. 10. 11.
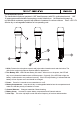
3.2 Handheld Microphone The handheld microphone operates in UHF band frequency with PLL synthesized control. UHF 16 preprogrammed selectable frequencies to avoid interference. Uni-directional dynamic or uni-directional condenser capsules with different characters for various choices. Use 2 x DC1.5V AA size dry or rechargeable batteries for low operating cost. 1. Grille: Protects the microphone capsule and helps reduce breath sounds and wind noise.
3.3 Bodypack Transmitter The bodypack transmitter operates in UHF band frequency with PLL synthesized control. UHF 16 preprogrammed selectable frequencies to avoid interference. Uni-directional condenser cartridges with different characters for various choices. Use 1.5V x 2 AA size dry or rechargeable batteries for low operating cost. LINE MIC. 1. Power: Press for 4 seconds to power the transmitter on or off. 2.
WIRELESS 4 4.
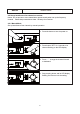
SET UP MANUAL MODE 4.2 Set up interference-free channel on receiver Notice: Do not put two or more transmitters operate nearby when set up the frequency channel. Please keep transmitter at least 1 M away from receiver. 4.2.1 Manual Mode Set up interference -free channel by manual operation. ¾ Press the button to turn the power on. ¾ Press button “SET” for 1 second to let channel flashing on the LED display. ¾ Press △▽ change the channel forward or backward.
SET UP AUTO-SCAN MODE 4.2.2 Auto-Scan Mode Set up interference-free channel by auto-scan programmed search. Press the button to turn the power on. Press button “Set” for 3 seconds to search the next interference-free channel automatically. The auto-scan system would stop at the next interference-free channel. Stop pressing button and let LED display flashing five times to lock the setting. NOTE: If user need to set up a multi-receiver system, please keep your previous receiver-microphone pair power on.
4.3 Set up the handheld microphone / Bodypack transmitter N E P O _ " $ ! Z|\Z+\ # ] $ $ J $ " $ ! ! Z|\ Z+\# `G ! " + $ <` $ ! # ] $ !
SET UP 4.4 Low Battery If the LED stays flashing , it indicates that the battery will out of power soon and should be changed. 4.5 Adjusting Gain Use MIC/LINE switch to adjust the input level. Switching the selector to the Mic position when connect with microphone for the normal audio input level. Switching the selector to the Line position when connect with instrument for the high audio input level.
5.
6 whether is set too high or too low.
SPECIFICATION 7. Carrier Frequency Range : UHF 520 - 930MHz Oscillator : PLL Synthesized Modulation : FM Frequency Stability : ±0.005% S/N ratio : ɧ}$[& $ " $ > $[ Image and Spurious Rejection : 80 dB minimum Receiving Sensitivity " $[ K? Selectivity : ɧ50dB AF Response : 80Hz to 16KHz T.H.D. : ɦ1% (at 1KHz) IF Frequency : 1st: 243.95MHz Dynamic Range : ɧ96dB Tone Signal : 32.