
User's Manual


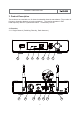
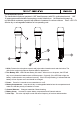

1. Power: Press for 4 seconds to power the transmitter on or off.
2. Mini XLR Connector: The included electret lapel microphone is inserted into the connector
on transmitter.
3. Antenna: Permanently connected, helical antenna.
4. Low Battery LED: LED indicates battery life status. When turn on the power, the LED will
stay on to indicate the batteries have sufficient power. Contrarily, if the LED fails to light, the
battery is either dead or not positioned correctly. If the LED stays flashing, it indicates that the
battery will out of power soon and should be changed.
5. Channel Selector: Changes transmitter Channel setting.
6. Mic/Line Selector: The switch sets the audio input either to microphone level or line level.
7. Gain: The rotary control adjusts the input audio level of the transmitter. The gain adjustment
range is 10dB.
8. Mic Unit: The uni-directional electret condenser unit features the wide frequency response
for warm, rich bass and clear sound.
9. Tie Clip: To clip on the tie or lapel for free-movement.
10. Cable: With mini XLR connector cable to connect th
e transmitter.
11. Battery Compartment: Insert two AA dry or rechargeable batteries into the compartment and
make sure that the polarity of batteries is correct.
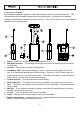
3.3 Bodypack Transmitter
The bodypack transmitter operates in UHF band frequency with PLL synthesized control. UHF
16 preprogrammed selectable frequencies to avoid interference. Uni-directional condenser
cartridges with different characters for various choices. Use 1.5V x 2 AA size dry or rechargeable
batteries for low operating cost.
6
LINE MIC.