
How to Paint or Stain


1-800-663-DOOR masonite.com
MIC-18127 / ©2018 Masonite International Corporation.
SET-UP YOUR FINISHING AREA
Field finishing of interior doors can be accomplished by several methods, using a variety of
materials. First, assemble all the materials needed for your door finishing project. See list on
page 2.
Your work area should be clean, well-lighted, dust free, well ventilated, out of direct sunlight
and in a climate controlled environment. When painting and staining avoid carpeted areas,
cover all areas subject to paint or stain exposure.
STORAGE AND HANDLING
Deliver doors to the building site after the plaster, drywall and/or concrete are dry.
Store flat on a level surface in a clean, dry, well ventilated building. Protect from dirt,
water and abuse. Allow air circulation. Cover the top door with a moisture barrier.
Doors should not be subjected to abnormal or sudden variations in heat, dryness
or humidity, and should not be exposed to direct sunlight. Recommended
humidity and temperature are 25% – 55% RH and 50°F – 90°F (10°C – 32°C).
Doors should be stored at least 10' away from any heat source.
Excessive heat on a door creates uneven drying which results
in warping, splitting, and bowing on the door surfaces.
Doors should be climatized to the average prevailing humidity and
temperature before hanging for at least 48 hours. In below-zero or
extreme temperatures, doors should be stored properly in a dry building
at normal room temperatures for at least 72 hours before hanging.
Handle with clean hands or gloves and do not drag doors
across one another or across other surfaces.
For additional details reference Window & Door Manufacturers Association
guidelines on how to store, handle, finish and install wood doors.
PREPARATION
Doors should acclimate to the environment where they will be installed for a minimum of
48 hours under normal room temperatures conditions (72 Hours in extreme weather
conditions). Avoid finishing immediately after a rain or damp weather and during periods of
higher than average humidity. In very dry conditions, the door should be finished right after
the wrapping is removed. Ensure adequate air flow around all surfaces of the door when
conditioning. Follow paint/stain manufacturer’s instructions noting both temperature and
humidity recommendations. Remove all hardware before finishing.
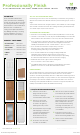
IDENTIFY YOUR DOOR
A MOLDED PANEL Paint Option
B FLUSH (primed or raw) Stain/Paint Option
C WOOD PANEL Stain/Paint Option
D LOUVER (primed or raw) Stain/Paint Option
E FRENCH Stain/Paint Option
F MDF Paint Option
1.
Finish doors with the door
laying horizontal on a bench
or workhorse. Spraying is
recommended for uniform results.
2.
Remove any excess paint
or stain from the corners of
the panels or lite grilles by
feathering with a dry 1" brush.
3.
Allow paint/stain to dry thoroughly
before applying a second coat.
Consult the paint manufacturer’s
instructions for drying times.
Sand in-between coats. Do
not sand the final top coat.
4.
All six sides of the door must
be sealed. (See FIGURE J)
5.
After the door is painted or stained
and completely dry, install hardware.
6.
French doors or doors with glass:
Remove protective film immediately
after finishing the door. Use a sharp
blade or utility knife to cut away
the protective plastic film leaving
clean edges around the lites. Use
protective gloves during this process.
(See FIGURE K)
7.
If finishing more than one door,
complete one door and evaluate the
finish before finishing multiple doors.
8.
All doors must be finished within
7 days of installation.
STAIN/PAINT RECOMMENDATIONS
E
French
C
Wood Panel
A
Molded Panel
F
MDF Panel
B
Flush
D
Louver
Professionally Finish
FLUSH. MOLDED PANEL. MDF PANEL. WOOD PANEL. FRENCH. LOUVER.
IMPORTANT
Please read and understand the
entire procedure before attempting
to finish your doors. Be sure to follow
the coating manufacturer's warnings
and instructions on all product labels.
Masonite does not warrant any
coating unless applied by Masonite.
Any damage caused by or resulting
from the application of a stain or
paint will void the door warranty.
MIC-18127-INT-Finishing-Instructions.indd 1 7/20/18 2:02 PM