
Use and Care Guide


STAIN
PAINT
&
Masonite’s
Instructions
the beautiful door
LWS-15503-9
FINISHING YOUR MOLDED PANEL, MDF PANEL & FLUSH DOORS
FIGURE A FIGURE B
PRIMER Molded panel doors and white
ush doors are primed. If primer has been
removed or damaged from any part of the
door during shipping or handling, remove
handling marks by lightly sanding before
re-priming all areas where it is removed.
If additional primer is used ensure the
paint meets the desired nished door
results. Follow the primer manufacturer’s
instructions for application. Ensure the
primer is compatible with both the paint
and primed door.
PAINT Masonite recommends a high
quality semi-gloss, water-based or oil-based
paint. Consult with your topcoat supplier for
the correct paint to work with your Masonite
door. Follow the paint manufacturers
instructions. A quality nish is achieved
with a minimum of two coats following the
paint manufacturers instructions for drying
time and application. Masonite does not
recommend dark or high gloss paints. If a
higher quality nish is preferred additional
coats and sanding will be required following
the coating manufacturers instructions.
FIGURE C
Front
Back
Side
Edge
Side
Edge
Bottom Edge
Top Edge
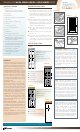
FIGURE D
Paint in the following order:
➊ Flush surface
➋ Finish all edges
(see gure C)
FLUSH PRIMED
FIGURE E
Paint in the
following order:
➊ Door panels
➋ Center stiles
➌ Horizontal rails
➍ Vertical stiles
➎ Finish all edges
(see gure C)
MOLDED & MDF PANEL
FIGURE F
1 Remove any excess paint from the corners
of the panels by lightly brushing with a dry
1" brush.
2 Allow paint to dry thoroughly before
applying a second coat. Consult the paint
manufacturer’s instructions for drying times.
Sand in-between coats. Do not sand the
nal top coat.
3 All six sides of the door must be painted to
maintain the warranty. (See gure D)
4 After the door is painted and completely
dry, install hardware.
AFTER YOU PAINT
HOW TO PAINT
BEFORE YOU PAINT (All door types)
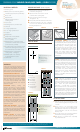
1 Inspect the door and sand imperfections
as needed. (See gure A)
2 Wipe down with a tack cloth to ensure
a dust free nish. (See gure B)
3 Paint in following order for door type.
(See gures E – G)
4 Read paint/stain manufacturer’s instructions.
5 If nishing more than one door, complete
one door and evaluate the nish before
nishing multiple doors.
WARNING
Some issues are caused by incorrect topcoat and/
or improper coating techniques. Masonite is not
responsible for issues related to incorrect topcoats.
Always follow the recommended instructions or
the instructions of paint or stain manufacturers.
TELEGRAPHING OR FIBER RISE Rough or
raised straw-like protrusions, appears as a result
of incorrect topcoat (paints or stains), improper
nishing techniques and or nishing conditions.
These are caused by but are not limited
to incorrect topcoat, watered down paints,
high humidity environments, and excessive
application of paints.
DISTORTION Warping, bowing and
waviness, can appear as a result of incorrect
topcoat (paints or stains), improper nishing
techniques and or nishing conditions. These
are caused by but are not limited to incorrect
topcoat, watered down paints, high humidity
environments, excessive application of paints,
and doors not being acclimated properly.
GRAIN RAISE The visible rise of the natural
woodgrain, can be caused by but are not limited
to incorrect topcoat, watered down paints,
high humidity environments, and excessive
application of paints.
POOR PAINT ADHESION A poor bond of
the paint to the door, can be caused by but are
not limited to incorrect topcoat, watered down
paints, high humidity environments, excessive
application of paints, and painting an improperly
prepared door.
ORANGE PEELING An orange skin-like,
can be caused by some but are not limited
to; incorrect topcoat, paint drying too fast, and
excessive application of paints.
MATERIALS NEEDED
■
Rubber gloves
■
Other personal protective gear as
needed (eye protection/ventilator)
■
Drop cloth
■
Paper towels
■
220 grit sandpaper and
sanding block
■
Tack cloths
■
Masking tape or painter’s tape
■
Stir sticks
■
1" High quality brush
■
3" – 4" High quality brush
■
Scraper
■
Putty knives
■
Utility knife or sharp blade
■
Wood ller (for wood
doors or jambs)
■
Water based or oil based primer
(needed for sanded and unprimed
products to be painted)
■
Conditioner and wood sealer (to be
used when staining wood doors or
wood veneer doors for even color)
■
Water based or oil based top
coat (paint) – semi-gloss
■
Mineral spirits – for cleanup,
if oil-based paint is used
■
Sawhorses
WOOD LOUVER PRIMED
Paint in the following order:
➊ Start with the louvers/
panels
➋ Horizontal rails
➌ Vertical stiles
FIGURE G
Read all instructions thoroughly before beginning. This is a guideline for painting and nishing interior doors.
Consult a paint professional or local paint department/store for coatings best suited to the project.
PRE-PRIMED DOORS Light sanding
of pre-primed doors prior to painting is
recommended. If primer has been removed
or damaged from any part of the door
during shipping or handling, lightly sand
and re-prime the exposed areas. Follow
the primer manufacturer’s instructions for
application. If additional primer is used,
ensure the primer meets the desired
nished door results. Ensure the primer
is compatible with both the paint and
primed door.
1-800-663-3667
■
www.masonite.com