Rotary Mowers OWNER’S MANUAL IMPORTANT: Keep these instructions and the engine booklet in a safe place for future reference. They contain important information about your mower. 1 Part No: 583152.H.0 This manual covers a range of different Masport mowers. Some features mentioned may not apply to your mower.
CONTENTS EXPLANATION OF SYMBOLS 3 SAFETY 4 INSTRUCTIONS 4 TRAINING ����������������������������������������������������������������������������������������������������������������������������������������������������������������������������������������������������������������������������� 4 PREPARATION ��������������������������������������������������������������������������������������������������������������������������������������������������������������������������������������������������������������
MOWING ADVICE 10 MOWING ADVICE—‘SMART CHUTE’ ������������������������������������������������������������������������������������������������������������������������������������������������������������������������������ 10 FITTING THE MULCHING BLOCK TO THE MOWER 10 FITTING THE SIDE DISCHARGE CHUTE 11 CHIPPER MOWERS 11 AFTER MOWING 11 CLEANING ������������������������������������������������������������������������������������������������������������������������������������������������������
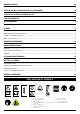
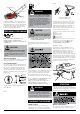
THIS MANUAL COVERS A RANGE OF DIFFERENT MASPORT MOWERS. SOME FEATURES MENTIONED MAY NOT APPLY TO YOUR MOWER. IMPORTANT: Keep these instructions and the engine booklet in a safe place for future reference. They contain important information about your mower. Record the serial number, you may need this when ordering ordering spare parts. Serial Number SAFETY INSTRUCTIONS PLEASE READ ALL INSTRUCTIONS BEFORE ATTEMPTING TO USE YOUR MOWER. TRAINING 1. Read the operating and maintenance manuals carefully.
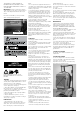
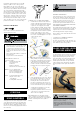
CAUTION Check that the control cables are not being strained while folding and unfolding the handle� Permanent kinks will make the controls difficult to operate� TIPPING THE MOWER SAFELY FOR STORAGE OR INSPECTION. CAUTION Tilting the mower—Drain fuel, then tilt the mower with the spark plug uppermost� Remove the spark plug lead� The 420mm model is shipped with the handle completely detached from the mower body although the upper handle may be connected by the throttle control cable to the engine.
engine.
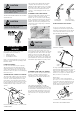
Pulsa Prime engines (which have no CHOKE marking or symbol on the control), push the primer bulb on the side of the engine by the carburettor, refer engine owner’s manual. (Do this also if you have just refilled the tank after running out of fuel). Grasp the starter grip, pull slowly until a resistance is felt and then pull forcefully to prevent kick-back. Repeat until the engine starts. Do not pull the cord with a jerk or release it until fully rewound.
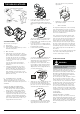
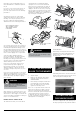
THE GRASS CATCHER edge of the bench, as it is pushed into engagement. 5 9 8 4 1 2 ‘B’ 10 7 63 ‘A’ 3. Look for the “F” on the handle and ensure that it will be adjacent to the “F” on the catcher shell. Fit the handle by pressing it firmly into the square recesses in the catcher top. ‘F’ ‘F’ CATCHER ASSEMBLY There are three catcher types: A. Bag Catcher B. Moulded Plastic Catcher C. Aero Catcher (moulded plastic top sections with fabric side panels.) A. 1. 4. 5. 6. B.
FABRIC TYPES. These depend on a free flow of air thought the fabric for effective grass collection. Wash as needed to restore and open mesh in the fabric. Do not leave a fabric bag in direct sunlight when not in use. While the bag will not rot if stored wet, prolonged sunlight exposure can cause premature breakdown of the material. Do not leave clippings in the catcher for extended periods. The catcher lip has two pins that need to be lined up with the slots of the housing.
followed by a lower cut (preferably a day or so later), will minimise the overall time required for the job. Do not try to cut too much off the grass at one time. This can cause excessive loads to be put on the engine and also effect the mulching performance. catching the grass or mulching. By simply opening the ‘door’ located on the bottom left hand corner of the ‘Smart Chute’, the lawn can safely be mown while smoothly spreading the clippings to the left.
THE MOWER MUST NEVER BE OPERATED WITHOUT EITHER THE GRASS CHUTE OR THE CHUTE FLAP INSTALLED. be worn. Empty the catcher frequently to avoid building up chippings inside the mower housing. Clear debris away from around the engine frequently to prevent any restriction with cooling air flow and prevent the risk of fire. Stop the engine before removing the catcher. AFTER MOWING result from a neglected blade. Your Authorised Dealer will be happy to sharpen or replace blades as necessary.
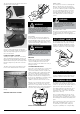
1. Follow the servicing instructions for removing the “Bar and Disc Blades’ on this page. When the blade carrier is removed from the crankshaft it can be place in a vice and the chipper blade removed. Either sharpen and balance out the old blade, or fit a new one. The mower blade should also be inspected at the same time. Assemble in the reverse order, taking care to align the keyway slot in the blade and the blade driver. 2. 3. 4. MUFFLER. A rusted or damaged muffler can permit increased exhaust noise.
BELT ADJUSTMENT SINGLE SPEED MODELS. (Except self propelled Chipper models & Rotarola) Keeping the spark plug uppermost, tilt the mower to gain access to the gearbox. Using two 10mm AF spanners, slacken the screw which clamps the gearbox anchor bracket to the mower housing just enough to allow the gearbox to be rotated about its output shaft. Rotate the gearbox to take any slack out of the V belt drive and reclamp the anchor bracket in its new position by tightening the clamp and screw firmly.
TROUBLE SHOOTING TROUBLE PROBABLE CAUSE SOLUTION Uneven or poor cut Blunt blade Sharpen blade Heavy mulch left on cut strip Cutting height is too low for the height of the grass being cut. Adjust the cutting height to approximately on third of the length of the grass. Then work down to the desired height. Engine not running at full speed Move the throttle to fast.
Head Office - New Zealand 1-37 Mt Wellington Highway.