PITTSBURGH, FATSO, OREGON, KLONDIKE & YUKON POT - BELLY STOVES INSTALLING AND OPERATING INSTRUCTIONS 585845
THIS BOOK CONTAINS IMPORTANT INFORMATION. PLEASE KEEP IT IN A SAFE PLACE FOR FUTURE REFERENCE. CONTENTS INTRODUCTION..................................................................... 1 UNPACKING – PITTSBURGH & FATSO............................... 2 STEADIHEAT CONTROL....................................................... 2 UNPACKING – KLONDIKE, YUKON & OREGON .............. 3 INSTALLING THE STOVE ..................................................... 3 MINIMUM UNSHIELDED WALL CLEARANCES ................
UNPACKING – PITTSBURGH & FATSO To facilitate shipping, the top belly is packed upside down inside the bottom belly. First bolt the four legs securely to the base. If a water heating coil is to be fitted, remove the two cover plugs in the bottom belly and insert the coil, securing it with the backing nuts provided. Check that the coil rises continuously from the bottom (inlet) to the top (outlet). If it does not do so, water flow may be hampered and steam formation in the pipe may cause hammering noises.
UNPACKING – KLONDIKE, YUKON AND OREGON These models are shipped with the bellies in their final orientation, but the joint between the top and bottom bellies has yet to be sealed. Before doing this, the OREGON has a baffle plate to be fitted, and the YUKON has a baffle plate and a flue elbow (or optional straight socket) to be assembled. Additionally, any of the three models may be fitted with a waterheating coil.
If the stove is a YUKON fitted with a straight flue socket, the clearance measurement is taken from the belly ring and 80mm must be added to the minimum clearance shown in the table. Remember, these minimum clearances may be significantly reduced by suitable heat shielding. (See later) Table 1. MINIMUM CLEARANCES TO UNSHIELDED HEAT SENSITIVE WALLS.
IMPORTANT: If the screen material is a single layer and is thick (e.g. concrete or brick), the stove must be at least 150mm from the face of the screen, regardless of the above allowable minimum distances between the stove and the wall. NOTE: A 1200mm long polished flue heat shield must be fitted to the heater when the above factors are used.
FLUE INSTALLATION The stove must be installed using a Masport approved flue kit (including a ceiling plate). Approved flue kits are supplied with detailed fitting instructions which, if followed, will ensure that the installation will meet the required safety standards for performance and durability. FIREPLACE INSTALLATION The model most convenient for this type of installation is the YUKON as it has a rear flue outlet enabling the flue to be routed up the chimney.
INSTALLING A STOVE WITH A WATER COIL Pot belly stoves may be installed in some parts of New Zealand but not in Australia. All plumbing work must meet the requirements of local Building Codes. Pipe connections are 1” BSP. Special piping methods must be followed to ensure effective circulation, and the hot water cylinder will need to have an internal riser pipe to two thirds of the cylinder height to discourage unwanted water circulation through the piping system when the heater is not burning.
OPERATING INSTRUCTIONS BEFORE LIGHTING THE FIRST FIRE If your flue is a bright stainless steel one, remove all fingerprints and other marks by polishing with a household metal polish. Do not use harsh abrasives such as steel wool. After several firings, the flue will develop an attractive copper-coloured ‘bloom’, but any fingerprint marks will show permanently on this bloom if not removed prior to lighting. The first fire should be a moderate one to cure the special high temperature paint.
Before lighting the fire, the damper must be fully open (its handle in line with the flue). If your stove has a STEADIHEAT control, its handle should be no lower than mid-way between the bottom(low) and top(high) positions. With all hot plates in place, light the paper in several places and close the top door. If your model has a rotating air control on the front of the top door, turn the round plate (using the multi-purpose tool) until the air holes in it are fully open.
REFUELLING (See FUEL, above) We recommend that the top door, rather than the hot-plate opening, be used for refuelling. CAUTION: ALWAYS ENSURE THAT THE FLUE DAMPER IS FULLY OPEN BEFORE OPENING THE TOP DOOR OR LIFTING A HOT-PLATE. (The damper is open when its handle is in line with the direction of the flue). This will prevent a possible flash-back from un-burned gases in the top chamber.
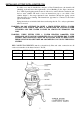
STOVE DIMENSIONS Pittsburgh Klondike Fatso Yukon Oregon 560 470 Front View 510 Side View 650 850 675 510 380 545 420 580 460 545 580 545 580 380 380 420 490 420 500 Belly Ring Dia. 445mm 365mm — 365mm — Flue I.Dia. 114mm 114mm 114mm 114mm 114mm Shipping Weight 71kg 44kg 69kg 37kg 48kg Shipping Dimensions W 535mm D 485mm H 805mm Vol. 0.21m3 W 480mm D 380mm H 650mm Vol. 0.119m3 W 570mm D 515mm H 615mm Vol. 0.18m3 W 435mm D 380mm H 500mm Vol. 0.