
Owner`s manual


13
For Models With Rotisserie - Assembly Instructions
Tools needed for assembly
Crosshead screwdriver, 10mm A/F spanner, 2x 8mm A/F Spanners.
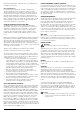
18. Assemble the Prong (24), the Rod-A (25), the Rod-B (26) and the Guide (27), the Rotisserie handle (28) together as in the diagram.
Note!
Rotisserie Rod 26 is threaded LH, assemble by turning rod anti-clockwise. Tighten with 8mm A/F Spanners. This connection must
remain spanner tight.
25
24
26
27
28
Place inside of grill
Assemble the Motor holder (29) to the appliance with 2pcs Screw M6*10 (a), 2 fibre washer (c) and 2pcs Nut M6 (f) as the
diagram. Place the battery (31) into the Motor (30). Assemble the Motor and Rotisserie to the appliance as the picture.
Note!
Take note of the battery + - positions prior to fitting the batteries.
Note! There is an option to use a mains adaptor (not stocked). Requires:
Mains adaptor 240 volt > 3 volt DC 3 milliamps or greater.
Rotisserie
Nut M6
Fibre washer
Screw M6*12
29
30
Note!
For 210 models without a Rotisserie, there is an option to purchase 559218 Rotisserie Set-210.
Natural Gas Conversion
The 210 Series of BBQ has the option of being converted to natural gas. This conversion must be actioned by a certified agent using a
Masport NG conversion kit.
Refer to technical data for jet size information.