
Owner`s manual


Appendix: Sound Anchors Stand Vertical Mounting Procedure
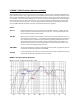
Note: There are two variants of Sound Anchor stands designed for the MM27. Earlier models have 1” thick
tubular steel mounting brackets. These require 2” long 5/16”-18 screws to fit the MM27 Gen2. Newer Sound
Anchor stands have 0.5” thick solid aluminum mounting brackets. These require 1.5” long 5/16”-18 screws to fit
the MM27 Gen2. Please check the size of the mounting screws supplied with your Sound Anchor stands to insure
a proper fit. Prior to mounting the stands, turn the screws into the side of the MM27 Gen2 by hand. M8 and
5/16-18 screws are very similar in size. Incorrect size screws will go in a few turns then begin to lock up. If this
occurs, contact Sound Anchors, Barefoot (info@barefootsound.com) or your dealer for the correct size screws.
1. Test the length of the screws by removing the mounting bracket from the stand and placing it on the side of
the speaker cabinet. Line up the mounting holes, insert the screws and finger tighten. The screws should
engage the threaded inserts and begin to pull the bracket snug against the speaker cabinet. If the bolts are too
long and bottom out before the bracket is snug against the speaker cabinet, STOP. You may have the wrong size
bolts. Contact Sound Anchors, Barefoot (info@barefootsound.com) or your dealer for the correct size screws.
2. Secure the speaker mounting bracket to the stand at desired height.
3. Attach MM27 Gen2 handles to the side of the cabinet opposite to the side the mounting bracket will attach to.
Then set the speaker horizontally on the floor.
4. Tilt stand down and line up the mounting bracket holes with the cabinet bolt holes.
5. Insert bolts and tighten until the mounting bracket is snug against the speaker cabinet. Do not over tighten!
A good way to ensure you do not over tighten the screws is to put the long end of the hex key into the screw and
turn it using the short end. Tighten the screw using no more force than you can apply to the short end of the hex
key while holding it in the tips of your thumb and index finger.
6. Carefully tilt the entire speaker and stand assembly back up so it stands vertically. This step may require assis-
tance because the speaker and stand are very heavy.
15