
Instructions


11
Bevor Sie Löcher oder Schlitze in
das Dach ihrer Lok fräsen/bohren:
Es gibt Dächer, bei denen die
Aufbauten eine mittige Anordnung
der Schlitze unmöglich machen.
In diesem Fall können die Schlitze
seitlich angebracht werden oder
die Aufbauten gekürzt werden.
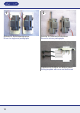
Das selbe gilt für den Einbau
von 2 Antrieben - z.B. bei der
Ge 2/4 (LGB 2045) lassen sich
die Antriebe nur nebeneinander
anordnen. Dazu müssen die
Schlitze zwingend seitlich versetzt
angeordnet werden.
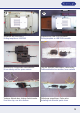
Die Montage ist prinzipiell mit den
beiliegenden Schrauben möglich,
führt aber im Regelfall dazu, dass
die Schraubenenden von außen auf
der Dachhaut sichtbar sind. Daher
empfehlen wir für die Fixierung des
Antriebs auf der Dachinnen seite
ein hochwertiges doppelseitiges
Klebeband. z.B. Tesa Powerstrips.
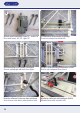
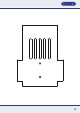
Zur Verbindung von Panto und An-
trieb ist der beiliegende schwarze
Stellhebel in der unteren Quertra-
verse (siehe Foto) einzuhängen
und durch den Schlitz im Dach vor
die Schubstange des Antriebs zu
positionieren.
Before you mill/drill holes or slots
in the roof of your locomotive:
There are roofs where the super-
structure makes a central arran-
gement of the slots impossible. In
this case, the slots can be placed
on the side or the roof equipment
can be shortened.
The same applies to the installa-
tion of 2 drives - e.g. with the Ge
2/4 (LGB 2045) the drives can
only be arranged side by side. For
this purpose, the slots must be
arranged laterally offset.
Using the supplied screws for
installation is optional, though it
may result in visible screw ends
on the upper outside of the roof.
Therefore we suggest to use a
high quality double sided tape (e.g.
Tesa Powerstrips) on the inside of
therooftoxatethepantograph
engine.
For connecting the pantograph and
engine, the supplied black switch
lever needs to be hooked to the
lower transverse traverse (see
picture) and be inserted through
the slot in the roof to be positioned
in front of the driving rod of the
engine.