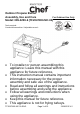
Outdoor Propane Burner Assembly, Use and Care For Outdoor Use Only Model: 085-3259-6 (TF2047903-MC-00) Tools required: Crosshead screwdriver / Adjustable wrench To installer or person assembling this appliance: Leave this manual with this appliance for future reference. This instruction manual contains important information necessary for the proper assembly and safe use of the appliance. Read and follow all warnings and instructions before assembling and using the appliance.
DANGER If you smell gas: 1. Shut off gas to the appliance. 2. Extinguish any open flame. 3. If odour continues, keep away from the appliance and immediately call your fire department. Failure to follow these instructions could result in fire or explosion which could cause property damage, personal injury or death. DANGER 1. Never operate this appliance unattended. 2. Never operate this appliance within 10’ (3 m) of any other gas cylinder. 3. Never operate this appliance within 25’ (7.
6. If a fire should occur, keep away from the appliance and immediately call your fire department. Do not attempt to extinguish an oil or grease fire with water. Failure to follow these instructions could result in fire, explosion or burn hazard which could cause property damage, personal injury or death. WARNING Combustion by-products when using this product contain chemicals known to cause cancer, birth defects, or other reproductive harm. WARNING This appliance is not intended for commercial use.
CAUTION CAUTION: Indicates a potentially hazardous situation or unsafe practice which, if not avoided, may result in minor or moderate injury. WARNING 1. 2. 3. 4. 5. 6. 7. 8. 9. Never leave the appliance unattended. Keep children and pets away from the appliance at all times. The use of alcohol, prescription or non-prescription drugs may impair the consumer’s ability to properly assemble or safely operate the appliance. This appliance is for OUTDOOR USE ONLY.
10. 11. 12. 13. 14. submerged. There must be a minimum of 3” (7.6 cm) between the water level and top of the vessel. (4) Remove the food product from the vessel and either mark the water level on the side of the vessel or measure the amount of water in the vessel. (5) Remove the water and completely dry the vessel and the food product. (6) This is the amount of cooking oil the vessel is to be filled with to cook the food product.
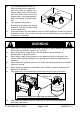
If you notice grease or other hot material dripping from appliance onto valve, hose or regulator, turn 10’ off gas supply at once. Determine (3 m) the cause, then correct, clean and inspect valve, hose and regulator 10’ before continuing. Perform a leak (3 m) test. The regulator may make a humming or whistling noise during operation. This will not affect safety or use of appliance. Clean and inspect the hose before each use of the appliance.
Always close LP tank valve and remove coupling nut before moving LP tank from specified operating position. Appliance must not be used for commercial cooking. This appliance will be hot during and after use. Use insulated oven mitts or gloves for protection from hot surfaces or splatter from cooking liquids. Avoid bumping or otherwise impacting the appliance to prevent spillage or splashing of hot cooking liquid. Never drop food or accessories into hot cooking liquid.
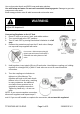
LP tank valve must have: Type 1 outlet compatible with regulator or appliance. Safety relief valve. UL-listed overfill protection device (OPD). This OPD safety feature is identified by a unique triangular hand-wheel. Use only tanks equipped with this type of valve. LP tank must be arranged for vapour withdrawal and include collar to protect LP tank valve. LP (Liquefied Petroleum Gas) LP gas is nontoxic, odourless and colourless when produced.
Use a clean paint brush and 50/50 soap and water solution. Use mild soap and water. Do not use household cleaning agents. Damage to gas train components can result. Brush soapy solution onto all weld seams and entire valve area. WARNING If “growing” bubbles appear, do not use or move the LP tank. Contact an LP gas supplier or your fire department. Connecting Regulator to the LP Tank 1. Place LP tank on a secure, level, and stable surface. 2. Turn control knob to the OFF position. 3.
WARNING Do not insert any tool or foreign object into the valve outlet or safety relief valve. You may damage the valve and cause a leak. Leaking propane may result in explosion, fire, severe personal injury, or death. Never attempt to attach this appliance to the self-contained LP gas system of a camper or trailer or motor home. The pressure regulator and hose assembly supplied with the appliance must be used.
WARNING When lighting the appliance, beware that body, head and hands should be kept away from the burner top opening to avoid any fire hazard. A long wooden match should be used for lighting. A match that is too short may burn your hand. Lighting Instructions 1. Read all instructions before lighting. 2. Turn regulator control valve to OFF position. 3. Remove the rain cover. 4. Fully open LP bottle valve. 5. DO NOT stand with head or arms over cooker.
CAUTION If burner does not light OR if burner flame is accidentally extinguished, turn knob to OFF, wait 5 minutes and try again. If the burner does not ignite with valve open OR if burner flame is accidentally extinguished after lighting, gas will continue to flow out of the burner and could ignite with risk of injury. Burner Flame Check Light burner, rotate knob from HIGH to LOW. You should see a smaller Air Damper flame in LOW position than seen on HIGH. Always check flame prior to each use.
To help prevent a blockage and ensure full heat output, clean and inspect burner tube often (once or twice a month). NOTE: Water or air pressure will not normally clear a spider web. Steps for Cleaning the Burner: 1. Remove orifice/hose from the burner. 2. Look inside the burner tube for nests, webs, or mud. 3. 4. 5. To remove the above obstructions, use an accessory flexible venture brush or bend a small hook on one end of a long flexible wire such as the one shown in illustration.
CAUTION All cleaning and maintenance should only be done when the appliance is cool and with the fuel supply turned off at the LP tank. DO NOT clean any part in a self-cleaning oven. The extreme heat will damage the finish. Correct care and maintenance will keep your appliance operating smoothly. Clean regularly as determined by the amount of use. NOTE: Clean the entire appliance each year and tighten all hardware on a regular basis (1—2 times a year or more depending on usage).
Product Diagram 3 2 6 5 1 4 7 8 TF2047903-MC-00-ENG Page 15 of 21 20161205 V.
Component List 1. Steel stand 2. Burner 1 pc 5. Air vent 3. Burner bracket 1 pc 6. Rain cover 1 pc 4. Regulator hose assembly 1 pc 7. Regulator hook 1 pc 1 pc 8. Leg foot 1 pc 4 pcs Diagram Qty. Hardware List Item Item name No. A BOLT M6 x 12 4 B NUT M6 1 TF2047903-MC-00-ENG Page 16 of 21 20161205 V.
Assembly Procedures: Step 1: Insert the leg foot (8) into the stand leg. 1 8 Step 2: Attach the burner bracket (3) to burner (2) by using 2 M6x12 blot (A). 2 3 A TF2047903-MC-00-ENG Page 17 of 21 20161205 V.
Step 3: Attach burner (2) to the steel stand (1) as shown in Fig. A. Fasten the burner inlet first by using 1 M6x12 bolt (A). For the side of burner head, attach both the burner and the chain of the rain cover (6). Put the M6x12 bolt (A) through the chain hole of rain cover (6), the hole of burner bracket (3) and the mounting hole of steel stand (1). Fasten the bolt by using 1 M6 nut (B). A A A B Figure B Figure A Step 4: Attach the air vent (5) to the inlet of the burner (2).
Step 5: Attach the regulator hook (7) to the regulator hose assembly (4). When transporting or storing the appliance without tank attached, hook regulator onto steel stand as shown. 7 4 4 Step 6: The appliance is equipped with a rain cover (6). When storing the appliance, place the rain cover (6) on the burner. 6 TF2047903-MC-00-ENG Page 19 of 21 20161205 V.
DANGER An oil overflow may occur resulting in a fire which could cause property damage, personal injury or death. Follow directions above to prevent this. WARNING Avoid bumping or otherwise impacting the appliance to prevent spillage or splashing of hot cooking liquid. Introduction of water or ice from any source into the oil/grease may cause overflow and severe burns from hot oil and water splatter.
LIMITED WARRANTY 1. Limited 1-year Warranty This product carries a one (1) year warranty against defects in workmanship and materials. Trileaf Distribution agrees to replace a defective product, within the stated warranty period, when returned to the place of purchase with proof of purchase. This product is not guaranteed against wear or breakage due to misuse and/or abuse. 2.