259-0002 Tabletop Charcoal Grill Model # SRCG806 Instructions Manual
WARNING FOR YOUR SAFETY 1. This grill is for outdoor use only, and shall not be used in a building, garage, or any other enclosed area. 2. This grill is NOT for commercial use. 3. Do not use grill for indoor cooking or heating. Toxic carbon monoxide fumes can accumulate and cause asphyxiation. 4. Do not use petrol, paraffin, or alcohol for lighting. 5. Do not use in an explosive atmosphere. Keep grill area clear and free from combustible materials, petrol and other flammable vapors and liquids. 6.
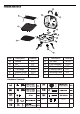
$ % . & ' ( ) , * + Part A. B. C. D. E. F. Description Handle Lid Air Damper Top Hinge Bottom Hinge Bottom Bowl Quantity Part Description Quantity 1PC 1PC 1PC 2PCS 2PCS 1PC G. H. I. J. K.
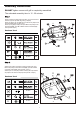
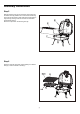
Assembly lnstructions DO NOT tighten screws until grill is completely assembled The estimated assembly time is: 15 - 20 minutes Attach handle(A) to lid(B) with 2pcs Ø6.4 round heat resistant washers (FF) and 2pcs M5 large wing nuts(DD). Attach air damper (C) to lid(B) with 1pc M5x12 A3 philips truss head screw(BB) and 1pc M5 nut(I I). Attach top hinge(D) to lid(B) with 2pcs M5x12 A3 philips truss head screws(BB), 2pcs Ø5.3 65Mn small lock washers(EE) and 2pcs M5 nuts(I I).
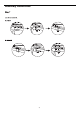
Assembly lnstructions Step 3 Attach leg assembly(H) to bottom bowl(F) with 4pcs M5x12 A3 philips truss head screws(BB) and 4pcs M5 nuts(I I). I I F Hardware Used 4 I I H M5 Nuts 4PCS Step 4 Insert top hinge(D) into bottom hinge(E) and secure them together with 2pcs Ø5x30 A3 pins(GG) and 2pcs 65Mn cotter pins(HH). Note: If top hinge(D) does not fit into bottom hinge(E), gently squeeze top hinge tabs together.
Assembly lnstructions Step 5 Slide the warming rack (K) into the holes of the lid (B) and the bottom bowl (F). Make sure to insert the short warming rack ends into the holes on both sides of the lid (B) and the long warming rack leg ends into the holes on both sides of the bottom bowl (F). Remove the zip tied on the warming rack (K). B . F Step 6 Place the charcoal grid(I) and cooking grate(J) into bottom bowl(F), in order as shown in drawing.
Assembly lnstructions
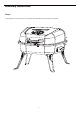
Assembly lnstructions Step 8 Congratulations! Your assembly is now complete. Read operating instructions before proceeding.
Operating lnstructions WARNING For Your Safety 1. The detachable handle is used for pushing and pulling the cooking grid only, and should always be the cooking grid when fire is on. 2. The hot cooking grid can only be operated by handle provided. 3. Do not touch the hot cooking grid by hand. 4. The detachable handle should always be kept away from the cooking grid when the grill is burning.