
Operator`s manual

Page 12
OPERATION
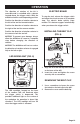
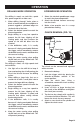
ADJUSTABLE TORQUE CLUTCH
(FIG. 10)
The torque clutch can be adjusted to any
of 24 different settings (23 driving and 1
drilling). The higher the torque setting, the
more force the cordless drill/driver produces
to turn an object in either LO or HI rotation
speed.
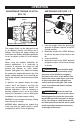
When using the cordless drill/driver for
driving applications, it is necessary to
increase or decrease the torque to help
prevent the damage to screw heads,
threads, work-piece, etc. Adjust the torque
by rotating the torque-adjustment ring. The
proper setting depends on the job and the
type of bit, fastener, and material you will be
using.
In general, use greater torque for larger
screws, but if the torque is too high, the
screws may be damaged or broken. For
delicate operations, such as removing a
partially stripped screw, use a low torque
setting. For operations such as drilling into
hardwood, use a higher torque setting.
NOTICE: Do not change the torque setting
when the tool is running.
NOTICE: When adjusting the torque ring,
make sure that the speed switch is either
completely in the LO or the HI position.
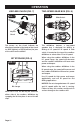
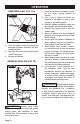
INSTALLING A BIT (FIG. 11)
1. Lock the trigger switch by placing the
direction-of-rotation selector in the OFF
(centre) position.
2. Rotate the chuck in the “OPEN” direction
to release the jaws of the chuck on the
bit.
3. Insert the drill bit.
4. Rotate the chuck in the “GRIP” direction
to tighten the jaws of the chuck securely
on the bit.
WARNING:
Do not hold the body
of the chuck with one hand while using
the power of the drill/driver to tighten
the jaws of the chuck on the drill bit. The
body of the chuck could slip in your hand,
or your hand could slip and come into
contact with the rotating bit. This could
cause an accident and result in serious
personal injury.
WARNING:
Be sure to insert the
drill bit straight into the jaws of the chuck.
Do not tighten the jaws of the chuck with
the drill bit inserted at an angle, as shown
in Fig. 13a. Doing so could cause the drill
bit to be thrown from the drill, which could
result in possibly serious personal injury
or damage to the chuck.
1 3 5
FIG.10
Arrow
Torque-Adjustment ring
17 19 21 23
FIG.11
Keyless
Chuck
Grip
Release