20V Lithium-Ion Impact Driver 241-0418 For questions/comments, technical assistance or repair parts – Please call toll free: 1-866-917-4374 (M – F 8am – 6pm EST) OPERATOR’S MANUAL CAUTION: To Reduce The Risk Of Injury, User Must Read And Understand Operator’s Manual. Save These Instructions For Future Reference.
table of contents Safety Symbols. . . . . . . . . . . . . . . . . . . . . . . . . . . . . . . . . . . . . . . . . . . . . . . . . . . . . . . . . . Page 2 Safety Instructions. . . . . . . . . . . . . . . . . . . . . . . . . . . . . . . . . . . . . . . . . . . . . . . . . . . . . . . Page 3 Overview/Specifications . . . . . . . . . . . . . . . . . . . . . . . . . . . . .
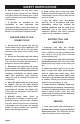
safety symbols Some of these following symbols may be used on this tool. Please study them and learn their meaning. Proper interpretation of these symbols will allow you to operate the tool better and more safely.
safety INSTRUCTIONS The purpose of safety symbols is to attract your attention to possible dangers. The safety symbols and the explanations with them deserve your careful attention and understanding. The symbol warnings do not, by themselves, eliminate any danger. The instructions and warnings they give are no substitutes for proper accident prevention measures.
safety INSTRUCTIONS WARNING: Read all safety warnings and instructions! Failure to follow the warnings and instructions may result in electric shock, fire and/or serious injury. Save all warnings and instructions for future reference. The term power tool in the warnings refers to your mains-operated (corded) power tool or battery-operated (cordless) power tool. WARNING: Risk of fire and electric shock. Do not use in rainy or wet conditions. Use in dry locationd only. WORK AREA SAFETY 1.
safety INSTRUCTIONS 6. Dress properly. Do not wear loose clothing or jewelry. Keep your hair, clothing and gloves away from moving parts. Loose clothes, jewelry or long hair can be caught in moving parts. 7. If devices are provided for the connection of dust extraction and collection facilities, ensure that these are connected and properly used. Use of these devices can reduce dust-related hazards. USE AND CARE of the power tools 1. Do not force the power tool.
safety INSTRUCTIONS SPECIFIC SAFETY RULES FOR CORDLESS IMPACT DRIVER 1. Use only the batteries and chargers listed below. Battery pack Charger 252-8024 252-8028 252-8029 252-8036 252-8030 252-8037 252-8032 252-8033 2. Hold power tools by their insulated gripping surfaces when performing an operation where the cutting tool may contact hidden wiring. Contact with a “live” wire will make exposed metal parts of the tool “live” and shock the operator. 3.
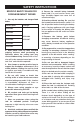
overview FIG. 1 Sleeve Vents Direction-of- Rotation Selector (Forward/ Center Lock/Reverse) Variable-Speed Trigger Switch LED Worklight Belt clip SPECIFICATIONS Motor 20 Volt DC Switch VSR (Variable Speed Reversible) No-Load Speed 0-2400 RPM Impacts per minute 0-3200 BPM Max Torque 1400 in-lbs Chuck 1/4" Hex Chuck Weight ( Without battery) 2 lb. 5 oz. (1.
ASSEMBLY CONTENTS 3. Inspect the tool carefully to make sure that no breakage or damage occurred during shipping. Impact Driver, 2 bits, manual 4. Do not discard the packing material until you have carefully inspected and satisfactorily operated the tool. Unpacking 1. This product has been shipped completely assembled. 2. Carefully remove the tool and any accessories from the box. Make sure that all items listed in the contents are included. OPERATION TO ATTACH BATTERY PACK (FIG. 2) FIG.
OPERATION TRIGGER SWITCH (FIG. 3) FIG. 3 DIRECTION-OF-ROTATION SELECTOR (FORWARD/CENTERLOCK/REVERSE) (FIG. 4) FIG. 4 Directionof-Rotation Selector Variable Speed Trigger Switch Forward Reverse To turn the Impact Driver ON, depress the trigger switch. To turn it OFF, release the trigger switch. VARIABLE SPEED (FIG. 3) The variable-speed trigger switch delivers higher speed with increased trigger pressure and lower speed with decreased trigger pressure.
OPERATION LED WORKLIGHT (FIG. 5) FIG. 5 LED Worklight REMOVING THE BELT CLIP 1. Use a screwdriver to loosen the screw that attaches the belt clip to the driver. 2. Remove the screw and the belt clip. BIT STORAGE (Fig. 7) FIG. 7 The LED worklight, located on the base of the Impact Driver, will illuminate when the trigger switch is depressed. This provides additional light on the surface of the workpiece for operation in lower-light areas.
OPERATION INSTALLING BITS (Fig. 8) FIG. 8 REMOVING BITS (Fig. 8) WARNING: Use protective gloves when removing the bit from the tool, or first allow the bit to cool down. The bit may be hot after prolonged use. 1. Lock the trigger switch by placing the direction-of rotation selector in the OFF (center) position. 2. Pull the sleeve towards the front of the tool and hold it in place. 3. Remove the bit from the hexagonal hole in the bit retainer. 1.
MAINTENANCE WARNING: To avoid serious personal injury, always remove the battery pack from the tool when cleaning or performing any maintenance. Never disassemble the power source, battery pack or charger. Contact a qualified service technician for ALL repairs. WARNING: Avoid using solvents when cleaning plastic parts. Most plastics are susceptible to damage from various types of commercial solvents and may be damaged by their use. Use clean cloths to remove dirt, dust, oil, grease, etc.
notes Page 13
CORDLESS IMPACT DRIVER WARRANTY 90-DAY MONEY BACK GUARANTEE: This MASTERFORCE® brand power tool carries our 90-DAY Money Back Guarantee. If you are not completely satisfied with your MASTERFORCE® brand power tool for any reason within ninety (90) days from the date of purchase, return the tool with your original receipt to any MENARDS® retail store, and we will provide you a refund – no questions asked.
© 2012 Menard, Inc.