
User's Manual

Master Lock Company LLC, Milwaukee, WI 53154 U.S.A. | 800-574-7260
©2017 Master Lock Company LLC | All Rights Reserved.
7 P57672 REV A
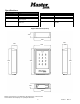
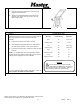
3.
Feed the keypad cable through the center hole in the mounting
surface
4.
Align the Keypad with the mounting surface so that the studs
pass through the (4) mounting holes.
5.
Thread the washers and lock nuts (not provided) onto the studs
and tighten.
6.
Trim the studs if necessary
Skip to Connecting the Keypad Steps on Page 6
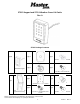
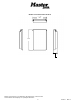
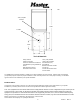
Installing the Keypad with a Weather Cover
1.
Prepare Mount
Identify the desired vertical height for your installation. (Note:
Ensure compliance with regulations and guidelines for
accessibility)
NOTE: Grommets of 5/8” diameter are provided in the weather
cover kit to protect the cable from sharp edges.
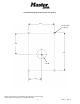
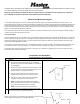
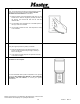
2.
Mark
1. Position the Weather Cover on the front of the mounting
surface, centered and leveled over the 5/8” hole.
2. Mark the (4) mounting holes at the outer edge of the back
plate. Set aside the cover.
3. Drill (4) holes of a size suitable for the mounting hardware
appropriate for your wall condition.
Follow steps 2.4 and 2.5 if you are using nutserts
otherwise proceed to step 3.
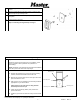
4. Center punch and drill (4) 19/64” (.297”) holes in the
punched locations.
5. Install the (4) nutserts into the holes using a nutsert install
tool.
Mounting Holes
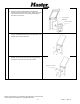
Weather Cover
Mounting Holes
Mounting Holes
Mounting Holes