
User's Manual


Monitor Features
NOTE: OBJECTS ARE CLOSER THAN THEY APPEAR ON THE MONITOR
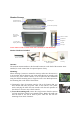
Monitor Hardware Included:
Antenna:
The wireless antenna attaches to the threaded connector on the back of the monitor. Once
attached, it can be rotated 360° for optimial picture clarity.
Mounting:
When choosing a location to mount the monitor, make sure the monitor is
in an area that will not obstruct your vision while driving or interfere with
access to any of the vehicle controls. It can be placed on the windshield
using the flexible mounting arm or clipped to an air vent. Both options use
the mounting slot on the back of the monitor.
1) Temporarily place the monitor stand or clip in the location that you
have chosen and route the power cable to the vehicle’s 12V power
outlet verifying the cable does not interfere with the safe operation of
the vehicle or access to any vehicle controls.
2) To use the mounting arm, remove the vinyl protector from the suction
cup base and place it firmly on a smooth surface. Rotate the small cam
near the base of the arm to hold in place. Slide the arm into the
mounting slot on back of monitor.
Vent Cli
p
Wireless Antenna
Power and
Channel LED
Indicator
Power button (On/Off)
Wireless Channel
Brightness
Contrast
No function
DC Input
Mounting Slot
Threaded Wireless
Antenna Connector
Flexible Mounting Arm w/
Suction Cup Base
Power Cable
Mounting Arm
Vent Clip
3.5” LCD TFT
Display, 480x234