
User's Manual

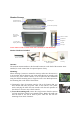


3) To use the vent clip, slide clip into the monitor mounting slot and gently press the clip and
monitor over the vehicle air vent fins.
Power Connection:
1) Insert the small DC plug of the power cable into the DC12V opening on the side of the
monitor.
2) Insert the larger 12 Volt power plug into the vehicle auxiliary power socket. The red LED
on the power plug will come on if the vehicle socket has power.
Notice: Depending on the make/model of the vehicle the ignition may need to be turned on
or to the accessory position for the 12V socket to have power.
Monitor Controls:
Power Button - Press the Power button to turn the display ON, the blue LED will appear,
indicating the monitor is ON. Press it again to turn the display OFF, the blue LED will
turn off.
Wireless Channel – This monitor can accept 4 different channels of wireless transmission.
To change the channel, press the “CH” button and it will go to the next channel, at
channel 4 it will return to channel 1. The camera is pre-set to channel 4.
Blue LED Power and Wireless Channel Indicator - When the monitor is ON the blue
LED will be lit. The location of the blue LED on the left side of the monitor also
indicates what channel the display is set to.
Brightness - There are 6 levels of brightness. To adjust the brightness, press the Brightness
Control button. Press the button to increase the brightness, at the highest level it will
return to the lowest level.
Contrast Control - There are 6 levels of contrast. To adjust the contrast, press the Contrast
Control button. Press the button to increase the contrast, at the highest level it will return
to the lowest level.
Notice: Under extreme bright light conditions, the screen image may take a few seconds to
automatically adjust. It is best to wait until the image has stabilized before backing up.
Testing the System:
1) Turn the vehicle ignition to the accessory position. Do not start the vehicle.
2) Turn on the monitor - the blue LED should come on.
3) IF there is no picture on the display:
a. Confirm that monitor is set to channel 4
b. Turn vehicle lights on
4) Adjust the monitor antenna for the best picture.
Notice: Re-locating the monitor even a small amount inside the vehicle can affect the
picture quality. This device, as well as all other wireless devices, may be subject to
interference caused by cell phones, Bluetooth headsets, Wi-Fi routers, power lines and
other various electrical equipment, etc. including other cameras.