
Owner`s manual


INSTALLATION INSTRUCTIONS
16
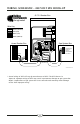
1.) Put spa in final position that allows for access to equipment
and spa components.
2.) Remove front side panel (This is the side where
the main topside control panel is located) so
electrical can be hooked up to the spa system pack.
Panels are removed by unscrewing the screws in the
corner sections and side panels (using #2 square bit).
Using a phillilps screwdriver may result in stripping
of the screw.
3.) Fill spa at least 1" above the filters. We recommend filling
the spa through the filter area.
4.) Turn the power on to the spa. Spa will go through its priming mode.
This lasts approximately 5 minutes.
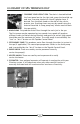
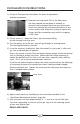
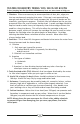
5.) It may be necessary to bleed air from the motor(s) on your spa if, after start
up, your spa pumps do not operate.
Due to the nature of water flow and hydro-therapy pumps, please be advised
that air locking of pumps may occur. Master Spas has taken measures to
reduce the possibility of this, but it still may occur, especially after refilling
a spa. This is not a service covered under warranty.
To relieve an airlock situation, loosen the union (see picture) on the discharge
of the pump (the end of the pump that water is being pushed through).
Water should leak out. Tighten the union and test the pump for proper jet
flow. If needed repeat process.
6.) Adjust water chemistry according to the instructions provided in the
“Spa Water Maintenance Section” (page 20).
7.) Your spa water will heat approximately 4° - 7° per hour, for all 240V spas.
This varies depending on the size of the spa. Step into the soothing waters
of your new Master Spa!
RELAX AND ENJOY.
Pump Union
Airlock