
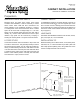
Installation Guide

Decorative Foot Installation
Before installing decorative foot, you will need to install the
standard
1
⁄8 in. finished toe kick (see Toe Kick Installation).
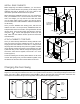
When installing the decorative foot it will be necessary to remove
the doors or drawers from the base cabinets or drawer banks.
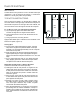
a) When installing a foot under a filler, apply double-sided
tape and adhesive to the back side of foot to secure in
place.
b) When installing a foot under a base, in addition to the back
side adhesion noted above, use a 1/8 in. drill bit to pre-drill
a hole just behind the face frame.
c) Using #8 x 2 in. wood screw, secure the foot into place
(Figure 10).
Note: If the floor is uneven and the foot doesn’t fit under the
vanity, stabilize the foot on its top and using a sanding block
and 100 grit sand paper. grind down the bottom as needed to
fit. Or use a miter saw to cut as needed.
Toe Valance Installation
Before installing toe valance, you will need to install the standard
1
⁄8 in. finished toe kick (see Toe Kick Installation).
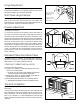
Once the doors and/or drawers are removed, place the clear vinyl
spacers (included), under the vanity between the face frame and
toe kick. These spacers will help prevent the toe valance from
rocking when clamped into position (Figure 11).
If installing valance with feet, it is best to start at one end of the
cabinet and work your way across (Figure 12).
a) Clamp into position.
b) Using 1/8 in. drill bit, pre-drill hole just behind the face
frame into the toe valance.
c) Using #8 x 1¼ in. wood screw, secure the toe valance
into place.
d) Continue installing the remaining feet and toe valances
in the same manner.
e) Reinstall the doors and drawers.
Hardware Installation
Once all the doors and drawers are adjusted, pre-mark the
fronts where hardware is desired.
Drill through your marks from the outside of the door to the
inside. A 1/8 in. drill bit is recommended to allow for final
adjustments to exact alignment.
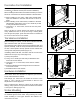
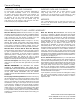
Note: To help prevent “blowout” (rupture of the surface when
drilling), clamp a piece of scrap wood to the back of the drawer
or door prior to drilling (Figure 13).
Scribe Moulding
Use scribe moulding to put the finishing touch on cabinets that
are installed against uneven walls. Using finishing nail, install
scribe moulding to cover gaps between the cabinets and
uneven floors or walls.
DETAIL A
SCALE 1 / 4
A
Figure 10
Figure 12
Figure 11
Figure 13
Door
Scrap wood