
User's Manual


11
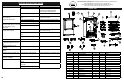
ASSEMBLY
STEP 11
Align keyholes on drip
defl ector (5) with studs on the
inside of smoker body. Press drip
defl ector down to secure in place.
5
STEP 12
Place water bowl (8), wood chip
tray (9), and drip pan (10) inside
smoker as shown.
Insert wood chip loader (12) into
side of smoker.
Assembly is complete.
8
9
10
12
8
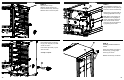
ASSEMBLY
STEP 6
Carefully position smoker as
shown.
Attach rear handle (3) to back of
smoker body (1) using phillips
screws (A) as shown.
Note: Do not lift unit by rear handle.
STEP 5
Insert adjustable screw leg (11)
through bottom of side panel (23)
as shown, and into smoker body.
Repeat step on opposite side for
remaining adjustable screw leg.
Note: When unit is upright, set
adjustable screw leg height by
turning clockwise/counterclock-
wise, so that smoker is level.
Once level, secure leg positions
by tightening tension nuts.
1
TENSION NUT
23
A
3
11