
User's Manual


ENSAMBLAJE
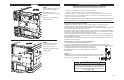
PASO 11
Coloque el tazón de agua (19)
bajo la última rejilla del ahuma-
dor. Fije el protector solar (7)
sobre el panel de control (4).
19
7
PASO 12
Coloque la bandeja de trozos de
madera (13) y la bandeja de goteo
(25) dentro del ahumador como
se muestra.
Inserte el cargador de trozos de
madera (24) en la parte lateral del
ahumador.
El ensamblaje está completo.
25
24
11
4
13
ASSEMBLY
STEP 6
Carefully position smoker as
shown.
Attach rear handle (5) to back of
smoker body (2) using phillips
screws (A) as shown.
Note: Do not lift unit by rear handle.
17
2
A
8
STEP 5
Insert adjustable screw leg (20)
through bottom of side panel (17)
as shown, and into smoker body.
Repeat step on opposite side for
remaining adjustable screw leg.
Note: When unit is upright, set
adjustable screw leg height by
turning clockwise/counterclock-
wise, so that smoker is level.
Once level, secure leg positions
by tightening tension nuts.
TENSION NUT
20
5