
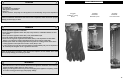
Instructions / Assembly


Regulator Control Valve
Soapy Water Test Warning and Procedures
• The Soapy Water Test must be performed each time gas cylinder is connected to appliance or
each time the appliance is used.
• The Soapy Water Test must be performed outdoors in a well-ventilated area.
• When performing the Soapy Water Test, always keep cooker away from open flames, sparks, or lit
cigarettes.
• This Outdoor Gas cooker is designed to operate with propane gas only. This product will not
operate with natural gas.
• Never use an open flame to test for gas leaks.
• Always remove any cookware from cooker stand when performing the Soapy Water Test.
PROCEDURE:
1.Remove any cookware from your cooker stand.
2. Turn regulator to OFF position, and turn the gas cylinder valve to the OFF
position.
3. Prepare your soapy water solution by combining (1) one part dish washing
liquid with (3) three parts water to test for the possibility of any gas leaks in the
hose or connections to regulator and the regulator connection to gas cylinder.
Apply soapy water solution to the gas cylinder valve, regulator and along the
hose to the burner.
4. Turn gas cylinder valve ON (regulator control valve should be in the OFF position)
and observe gas cylinder valve for bubbles. DO NOT LEAVE GAS ON FOR
MORE THAN 12 SECONDS. If bubbles appear, stop, turn gas cylinder OFF, and
retighten the fitting. Repeat test.
5. When the gas cylinder has been tested, open the regulator control valve one full
turn and check for bubbles at regulator control valve, along the entire length of
hose and at the connection to the burner . DO NOT LEAVE GAS ON FOR
MORE THAN 12 SECONDS. If soapy mixture starts bubbling, gas is leaking
through the connection or hose. Turn the regulator valve OFF and then the gas
cylinder OFF and retighten the connection that is leaking gas. After test is
complete, and there are no leaks, wait a minimum of 5 minutes for gas fumes
to diminish before lighting cooker.
DURING ANY PORTION OF THE SOAPY WATER TEST, IF BUBBLES CONTINUE TO
APPEAR, STOP, DO NOT USE THE APPLIANCE AND CONTACT YOUR LOCAL PROPANE
DEALER OR MASTERBUILT AT 1-800-489-1581.
NOTE: USE A 20 LB (9KG) CYLINDER WITH A PROTECTIVE COLLAR WITH THIS
APPLIANCE. ONLY CYLINDERS MARKED “PROPANE” MUST BE USED.
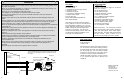
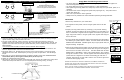
Bubbles in Soapy Water Test
Burner, Hose and orifice
Connection
Burner, Hose, Regulator and
Cylinder Valve
9 10
1. Check the regulator control valve to be certain it is in the OFF position before connecting to the gas
cylinder. Perform soapy water test before each use.
2. Turn gas cylinder valve ON. Place a lit match to the burner under the wind shield. Slowly turn
regulator control knob clockwise until the burner lights. (If burner does not light within 5 seconds, turn
regulator control valve OFF, then the gas cylinder valve OFF.) Wait 5 minutes for fumes to diminish
before relighting.
If the flame is blown out wait 5 minutes for fumes to diminish before relighting.
3. After the burner is lit, open the regulator valve until the flame increases. Use the air shutter on the
burner to adjust the flame until it turns blue. Reduce flame.
4. Fill pot with water or oil. DO NOT fill pot more than 1/3 the pots full capacity. This will help avoid
dangerous boil-overs. Note: DO NOT place your empty pot over the open flame. This will damage
the pot.
5. Bring water or oil to the desired temperature by adjusting regulator control valve. Oil should never
exceed 400°F (204°C). Oil will ignite at 550°F (287°C) to 700°F (371°C).
6. Always use a thermometer when cooking.
7. After each use, first turn the regulator control valve OFF, then turn the gas cylinder OFF. Always allow
cooker stand and pot with water or oil to cool completely before touching, moving, or storing.
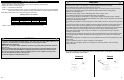
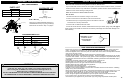
OFF
OFF
ON
ON
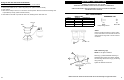
Type 1 CONNECTION
TO GAS CYLINDER
CLOCKWISE
COUNTER
CLOCKWISE
Inspect the hose before each use.
If there are signs of wear, cuts or leaks replace
cooker hose & regulator with Model 903070013.
COUNTER
CLOCKWISE
REGULATOR CONTROL VALVE OPERATIONS
REGULATOR TO GAS CYLINDER VALVE CONNECTION
REGULATOR CONTROL
FLAME ADJUSTMENT
The regulator control valve is used to adjust
the burner flame. Turning the control knob
clockwise slowly will increase the burner
flame and counter clockwise to decrease and
shut the burner flame off.
Adjust air shutter to the burner until the
burner flame is as blue as possible
CLOCKWISE
The Regulator Hook is used to keep the regulator off the
ground when removed from the LP cylinder.
Attach to appliance as shown.
Type 1 Regulators will have a hook as shown.
YELLOW
BLUE
CORRECT FLAME
INCORRECT
FLAME
BURNER LIGHTING INSTRUCTIONS
LIGHTING POSITION
FLAME VIEWING HOLE