
20020107 Propane Turkey Fryer Manual
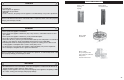
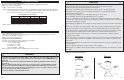


PARTS LIST
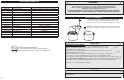
Remove nut (B) from bottom of burner. Place
burner onto burner mount bar with burner bolt
sticking down through hole in center of burner
mount bar.
NOTE: Do not over tighten. Threads should line
up, do not damage threads by forcing hose into
burner.
Place air shutter (5) onto burner venturi as shown.
Slide small end of spring (6) onto end of hose.
Thread end of hose into burner, turn
clockwise to tighten by hand.
NOTE: Do not tighten hardware.
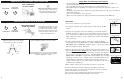
Place leg (2) inside windshield. Attach leg to
windshield using screw (A) and nut (C) as shown.
Repeat with other legs. Secure lower ring (3) to
each leg using screw (A) and nut (C).
Tighten all hardware at this time.
READ ALL INSTRUCTIONS AND WARNINGS CAREFULLY BEFORE
ASSEMBLY OR OPERATION OF YOUR TURKEY FRYER.
Burner Assembly
STEP 1
STEP 2
STEP 3
Mounting Legs
Mounting Hose & Regulator to the Burner
Burner Mount Bar
Venturi
Hose
Wind Shield
HARDWARE LIST
Before each use check all screws and nuts to be sure that they are tight and secure.
ASSEMBLY INSTRUCTIONS
4
5
6
1
B
3
A
C
A
2
6
17
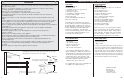
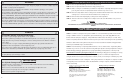
Using Pot with Drain Valve:
Units are sold with and without drain valves:
1. Valve must be in the OFF position before adding oil or water.
2. Secure valve cap onto drain valve.
3. Oil or water must be below 100ºF (37ºC) before draining.
CAUTION: Do not drain oil or water until the temperature of the
liquid is below 100ºF (37ºC). Hot water or oil can cause
serious burns and injury.
Drain
Valve
with Cap
Using the Pot with the Drain Hook Basket:
Do not overfill pot with oil or water. A fill line is
marked on the larger frying and boiling pots.
Smaller fry pans may not be marked.
1. Place seasoned food into basket.
2. Slowly lower basket into oil or water using lifting
hook. (Wear Protective Gloves) Stay away from
hot steam.
3. Cover with lid.
4. When food is ready to remove, turn the burner
to OFF position. Remove lid and use the lifting
hook to pull basket up slowly. (Wear Protective
Gloves) Stay away from hot steam.
5. Hook basket to the side of the pot with the drain
hook, allowing the food to drain and cool.
Using the Pot with the Turkey Hook:
Do not overfill pot with oil or water. A fill line is
marked on the larger frying and boiling pots.
Smaller fry pans may not be marked.
1. Position turkey hook on side.
2. Slowly slide turkey onto hook, breast cavity first,
as shown below.
3. Lower turkey hook into oil or water using lifting
hook. (Wear Protective Gloves) Stay away from
hot steam.
3. Cover with lid.
4. When food is ready to remove, turn the burner to
OFF position. Remove lid and use the lifting
hook to pull turkey hook up slowly. (Wear
Protective Gloves) Stay away from hot steam.
5. Allow the food to drain and cool.
Lifting Hook
Lifting Hook
Basket
Drain Hook
Turkey Hook
Fill Line
(A)
M6x13
Phillips Flange Screw
Qty: 9
(B)
Burner Nut
Qty: 1
(C)
M6 Hex Flange Nut
Qty: 9
ITEM NO. QUANTITY
DESCRIPTION
1 1 Fryer Head
2 3 Legs
3 1 Lower Ring
4 1 Regulator and Hose
5 1 Air Shutter
6 1 Spring