Masterclock TCDS-A User Manual – Original – 2013-04-19
Table of Contents Thank you for your purchase of a Masterclock Digital Display. Here you’ll find instructions for unpacking and installing your Masterclock Display(s), including suggestions for proper care and configuration. Introduction ............................................................................. 3 Features ................................................................................... 4 Power, Accessories and Software ........................................... 5 Mounting ............
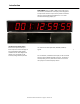
Introduction THE TCDS-A syncs to a IRIG or SMPTE Time Code source for accurate, traceable time The Display is also designed to accept several varieties of input and to provide countdown features using the Masterclock RC500. This is our most versatile time-keeping display yet The Masterclock Digital Display features one alpha-numeric (for future use) and numeric LED digits in a sturdy attractive black powdercoated steel case.
Features Your new TCDS-A provides easy-to-read accurate time based on TIME CODE references. Based on a design for NASA, the TCDS-A features countdown abilities, including the imposition of a hold. In addition the Display features: Real-time display back-up, it maintains accurate time during loss of power and/or TIME CODE reference. Time Zone offsets (to one second resolution), it supports any biasing requirements. Supports TIME CODE UTC, LOCAL, and Custom delivery time.
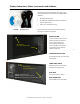
Display Connectors, Power, Accessories and Software The following items are Included for mounting, power, configuration and connectivity with your TCDS-A digital display kit CD-ROM IEC power cord Mounting brackets (two) CD-ROM (with WinDiscovery software application and User Manual pdf) Power cord – Standard IEC plug On the back of the unit the various power plugs and signal input connectors are placed.
Mounting Mount your Masterclock Display according to your needs. Appropriate brackets should already be included in your kit. DESIGNED FOR WALL, RACK OR TABLE MOUNT Your Masterclock Display is designed to fit a variety of surfaces and environments supported by these sturdy brackets. WALL MOUNT BRACKET A wall mounting bracket is supplied which has been designed to fit on either a standard 2”x 4” or 4” x 4” conduit box.
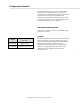
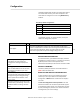
Configuration Checklist Your TCDS-A receives time cues from Time Code sources. Therefore, before installing this device, one should be prepared with the following basic configuration information that the device will require during installation and installation of the WinDiscovery configuration app. It may be necessary to obtain some or all of this information from a network administrator in your organization.
INITIAL OPERATION / SERVER ACQUISITION After receiving power, the Masterclock Display will go through an internal check. Time from the RTC backup will be applied until the TIME CODE signal is acquired. STATUS LED (LIGHT EMITTING DIODE) The LED colons between the digits on the display will follow the protocol after power is applied (operation is configurable via WinDiscovery.
TCXO AND RTC CIRCUIT The Display contains a RTC (Real Time Clock) circuit allowing the display to maintain an accuracy of ± 1 minute per year to the last known Time Code input (± 165 mSec per day) when Time Code is not present or cannot be decoded (i.e. freewheeling mode). MAINTENANCE-FREE RECHARGEABLE BATTERY The RTC is maintained continuously from a rechargeable battery circuit during periods of power outage. Minimum holdover period is two weeks with a fully-charged battery under constant drain.
Configuration The Masterclock Display maintains its configuration data in non-volatile flash memory, even when the power is off. These data are configured on screen using WinDiscovery software.
Installing the device driver Masterclock display Digital Timecode Display USB DEVICE DRIVER A USB type B port has been included on the rear cover of the display to configure the display to allow for firmware upgrades, corrections and enhancements. USB A cable end (to computer) INSTALLING THE DEVICE DRIVER First, power-on the display. Next, use a USB cable (not supplied) and connect the display to your PC. The Windows Plug and Play manager will detect a new USB device and request device drivers.
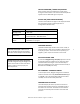
WinDiscovery The WinDiscovery software application is a device setup and configuration program that operates in the Microsoft Windows operating system and is supplied FREE with your TCDS-A device. INSTALLING WINDISCOVERY To install the WinDiscovery app complete the following steps: Insert the CD that shipped with your network device. 1. Run the “setup.exe” application from the CD. 2. By default, the setup utility will suggest installing files to C:\Program Files\Masterclock\WinDiscovery. Click OK.
Colored device description(s) indicate the following status conditions: BLUE: The device is connected via the USB port on the Windows Computer; this is common when configuring a Timecode variant. Black: The device is configured via DHCP over NTP and communicating normally. To configure and manage a Masterclock Display, right click the device name and a drop-down menu appears. To open a Masterclock Display “Device Settings” window directly, click the device name.
SET PASSWORD The “Set Password” window enables the entry of a new password for each individual device. The default password is public. A password is one to eleven characters and is case-sensitive. For added password strength, you should use a combination of alphanumeric and special ASCII characters (i.e. ASCII character codes 128 – 255). The password must be entered twice to confirm the entry. Select Change Password to save or Cancel to discard the change.
STATUS The Status button reveals a real time display. This update is not ultra-precise, but does provide remote view of the display from WinDiscovery for maintenance purposes. The time adjustments are listed here. They represent changes to the internal time reference as compared to the TIME CODE server. For instance: Interpretation of TIME CODE server SMPTE date encoding IRIG-B date encoding Incoming time code reference DISPLAY PROPERTIES Control the brightness of the display digits with a slider.
TIME ZONE SETTINGS Select “Time Zone Configuration” window. This window displays a list of Time Zones, including descriptions to help with the selection. Select your offset and select OK to close this window. ADMINISTRATIVE FUNCTIONS From the “Device Settings” window, click the [Administrative Functions] button to view the following choices.
Masterclock Digital Timecode Display Specifications USB ................................................................ B type connect Format ............................................................................. v1.1 Type ............................. LTC (Longitudinal/Linear Time Code), forward running, automatic detection and automatic gain adjustment. Impedance .................................................................. > 50 KΩ Nominal Level ......................................... 1.
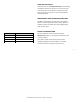
Time Code Format Inputs DST supported Masterclock display/Leitch IEEE - 1344 Date Encoding Year Encoding SMPTE – 30 fps √ - SMPTE – 25 fps (EBU) √ - SMPTE – 24 fps (FILM) √ - IRIG-B(00) pulse width modulated - √ IRIG-B(12)* amplitude modulated - √ POWER REQUIREMENTS AC Input Voltage 90 to 265 VAC Input Frequency 47 to 63 Hz Input Connector Universal IEC input connector Power consumption 10 W 18 INTERNAL BATTERY CIRCUIT Maintenance-free rechargeable battery 3V, 17 mAh, coin cell Rech
Troubleshooting Masterclock Digital Timecode Displays The easiest way to verify that your display is decoding Time Code is to observe the LED colons between the display digits. If the colons are flashing at a rate of 1 pulse per second or dashes are displayed, then there is an issue with the input Time Code signal. The colons will be on continuously when synchronized to a time source. A secondary method is to monitor the Time Code status while using the WinDiscovery app.
PROBLEM: Not displaying the correct local time and/or date Possible reasons/solutions: Your display has an incorrect Time Zone offset and/or DST offset configured. Your Time Code source and/or the display are set with Time Zone and/or DST offsets. Your Time Code source is not providing the time and/or date that you expect. Contact the individual responsible for the Time Code source for more information.
If you are using in-house Time Code, verify that the Time Code source is locked to the GPS satellite system for UTC Time Code. Time Code sources, such as SMPTE Time Code, that are fed via a broadcast satellite, will have a delay due to the satellite transmission. Your display cannot compensate for satellite transmission delays.
Care and Cleaning Adherence to regular and proper cleaning procedures is recommended to preserve appearance. Scratched or otherwise damaged lenses caused by misuse, mishandling, improper storage, or improper cleaning is not covered under the limited warranty. MINIMIZE HAIRLINE SCRATCHES Always store the device face-up in the protective plastic shipping bag until ready for installation and during transportation to the installation site.
CLEANING THE LENS The following cleaning agents have been found to be compatible with the Polycarbonate and Acrylic lens. Manufacturer's instructions should be followed. Formula 409™ (Clorox Co. Top Job™ (Proctor and Gamble) VM and P grade Naphtha Joy™ (Proctor and Gamble) Windex w/Ammonia D™ (Drackett Products) Palmolive Liquid™ (Colgate Palmolive).
Limited Warranty This Masterclock product warranty extends to the original purchaser. Masterclock warrants this TCDS-A against defects in materials and workmanship for a period of five years from the date of sale. If Masterclock receives notice of such defects during the warranty period, Masterclock will, at its option, either repair or replace products that prove to be defective.
Service and Return Information We sincerely hope that you never experience a problem with any Masterclock product. If you do need service, contact Masterclock’s Technical Support team. A trained specialist will help you to quickly determine the source of the problem. Many problems are easily resolved with a phone call or email. If it is necessary to return a unit to us, an RMA (Return Material Authorization) number will be given to you. Visit our website to download a current RMA request form. http://www.
Health and Safety These devices generate, use and can radiate radio frequency energy and, if not installed and used in accordance with the instructions, may cause harmful interference to radio communications. There is no guarantee that interference will not occur in a particular installation.
Declaration of Conformity DoC#: TCDSA-AC-201304 Masterclock, Inc. 2484 West Clay St. Saint Charles, MO 63301 Timecode Digital Time Display TCDSxx-A (AC power) where alphanumeric xx indicates digit size, count and configuration, is compliant with the CE directives and standards listed below.
FCC STATEMENT This device complies with Part 15 of the FCC Rules and found to comply with the limits for a Class B digital device. These limits are designed to provide reasonable protection against harmful interference in a commercial/residential installation.
Copyright © 2013 Masterclock, Inc. All rights reserved. No part of this publication may be reproduced, stored in a retrieval system, or transmitted in any form or by any means, electronic, mechanical, photocopying, recording or otherwise, without the prior written consent of Masterclock display, Inc. Trademarks Masterclock is a registered trademark of Masterclock, inc. Other trademarks mentioned in this manual are the property of their respective owners.
Plan View of Wall Mounting Bracket (see page 6) Designed to fit on either a standard 2”x 4” or 4” x 4” conduit box. Mount the bracket on the wall/conduit box, attach the power cord and CAT5 Ethernet patch cable and secure the Display to the bracket using the supplied retaining screws.
Contact Us Masterclock, Inc. 2484 West Clay Street St. Charles, MO 63301 USA website www.Masterclock.com USA and Canada 1-800-940-2248 1-636-724-3666 1-636-724-3776 (fax) International 1-636-724-3666 1-636-724-3776 (fax) Sales sales@Masterclock.com Technical Support support@Masterclock.