
Owner manual


17
ENGLISH
18) While the machine is recovering, use an electronic leak detector to check the seal on the connections that were opened to replace the filters.
Re-tighten if necessary.
19) Turn the machine off and replace the rear plastic cover on the machine. (6 screws)
20) The machine is now ready for normal use.
FILLING THE NEW OIL CONTAINER
It is good practice to fill the oil container whenever the oil level falls below 3.4 oz (100 cc) in order to guarantee that there will be sufficient oil for
topping off during successive operations. Always refer to the information provided by the A/C system manufacturer for oil specifications (oil is not
supplied.)
Lift the quick-connect coupling near the top of the container and remove the container complete with cap. Unscrew the cap and fill the container
with the correct quantity of oil of suitable type and grade. Screw the cap back on and, lifting the quick-connect coupling as above, replace the
container in its holder.
EMPTYING THE USED OIL CONTAINER
This operation must be performed whenever the oil level exceeds 6.7 oz (200 cc.) Procedure: Remove the container from its holder. Unscrew the
container while holding the cap in place. Empty the used oil into a suitable container for used oils. Screw the container back in place while holding
the cap in place. Carefully replace the container into its holder. (Dispose of used oil as per your federal, local and state regulations.)
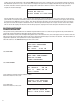
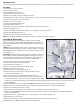
CHECKING THE SCALE RESPONSE
Turn the unit on and note the “REF AVAILABLE” reading. Hang the 500g test weight that was supplied with the machine from the hook under the
scale. (Fig 13-7) The “REF AVAILABLE” should go up by 500g +/- 28g, 1.10lb +/- .06lb or 1lb 2oz +/- 1oz depending on what units the machine is
set at. If the results of the test are not within these specifications, it is recommended that the scale be re-calibrated. The scale re-calibration should
be done by a qualified Service Technician. The equipment necessary for scale re-calibration is not supplied with 69788.
FIG. 13
PURGING NON-CONDENSABLE GASES
If 69788 should become loaded with excessive tank pressure due to the accumulation of NCG (Non-Condensable Gases) it will be necessary that the
operator purge the NCG manually. The operator will need to start and stop the manual purge.
Select NEXT MENU, scroll down with the arrow, select AIR PURGE. The following screen will be displayed:
AIR PURGE
PRESS START
Tp: xx psi T: xx.x ˚F
Note the Tp (Tank Pressure) and T (Temperature). Refer to the Pressure/Temperature Chart (P/T Chart) Fig. 14 and determine what pressure matches
the temperature showing on the screen. This is the pressure that should be in the tank. Any pressure above that value is NGC.
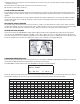
PRESSURE/TEMPERATURE CHART R134a
˚F PSI ˚F PSI ˚F PSI ˚F PSI ˚F PSI ˚F PSI ˚F PSI ˚F PSI ˚F PSI
200 488.9 142 235.8 124 182.2 106 137.3 88 100.7 70 71.2 52 47.7 34 29.5 16 15.7
190 434.9 140 229.4 122 176.6 104 132.9 86 97.1 68 68.3 50 45.5 32 27.8 14 14.4
180 385.6 138 223.0 120 171.3 102 128.5 84 93.6 66 65.5 48 43.3 30 26.1 12 13.1
170 340.8 136 216.8 118 166.1 100 124.3 82 90.2 64 62.7 46 41.1 28 24.5
160 300.0 134 210.7 116 161.1 98 120.1 80 86.8 62 60.1 44 39.1 26 22.9
150 263.0 132 204.7 114 156.1 96 116.1 78 83.5 60 57.5 42 37.0 24 21.4
148 256.0 130 198.9 112 151.3 94 112.1 76 80.3 58 55.0 40 35.1 22 19.9
146 249.2 128 193.1 110 146.5 92 108.2 74 77.2 56 52.3 38 33.2 20 18.4
144 242.4 126 187.5 108 142.8 90 104.4 72 74.2 54 50.1 36 31.3 18 17.0
Note: The units of negative pressure values are inHG
Fig. 14