
Installation Sheet


3
110499
• Cover unit. To protect the life of the fi nish, a cover for the unit is
suggested in extended periods of non use.
• Unplug unit from power supply during extended periods of non
use.
By following the operating, installation, and maintenance sugges-
tions as outlined, you can get many years of effi cient and satisfactory
service from your cooler. In the event additional information is
desired, your dealer will be more than glad to assist you in every
possible way.
Problem Possible Cause Remedy
Failure to
start or no
air delivery
Inadequate
air delivery
with cooler
running
Inadequate
cooling
1. No electrical power to
unit
• Fuse blown
• Circuit breaker tripped
• Electric cord damage
2. Motor overheated
• Bearings dry
3. Motor locked
1. Insuffi cient air exhaust
2. Pads plugged
1. Inadequate exhaust in
house
2. Pads not wet
• Pads plugged
• Open spots in pads
• Trough holes or Dis-
tributor system clogged
• Pump not working
properly
1. Check power
• Replace fuse
• Reset breaker
• Replace cord
2. Determine cause of
overheating
• Oil bearings
3. Replace motor
1. Open windows or
doors to increase air
fl ow
2. Replace pads
1. Open windows or
doors to increase air
fl ow
2. Check water distribu-
tion system
• Replace pads
• Repack pads
• Clean
• Replace or clean
pump (Unplug unit)
Troubleshooting Guide
Problem Possible Cause Remedy
1. Low voltage
2. Motor bearings dry
3. Wheel rubbing blower
housing
4. Faulty motor
1. Motor bearings dry
2. Wheel rubbing blower
housing
3. Loose parts
1. Inadequate exhaust
1. Stale or stagnate water
in cooler
2. Pads not wetting
properly
• Trough holes clogged
• Pump not wetting
properly
• Insuffi cient water fl ow
over pads
1. Check voltage
2. Oil bearings
3. Inspect and realign
(Unplug unit)
4. Replace motor
1. Oil bearings
2. Inspect and realign
(Unplug unit)
3. Tighten loose parts
1. Open doors or win-
dows
1. Drain pan and clean
pads
2. Check water distribu-
tion system
• Clean
• Replace or clean
pump (Unplug unit)
• Clean distribution
system and trough
openings
Motor
cycles on
and off
Noisy
Excessive
humidity in
house
Musty or
unpleasant
odor
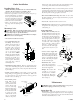
• Clean pump. Cleaning the pump is necessary once a year at
start-up. For your safety, turn unit off and unplug from power
receptacle. Remove the pump from the mount slot. Remove the
base of the pump (Fig. 7). Clean the pump and turn the impeller
to ensure free operation. Remove the pump spout and check for
any blockage. After cleaning,
reinstall the base onto the pump.
Press fi rmly to make sure it is
secure. Reattach the pump to
the mount in the cooler using
the plastic retainer to ensure that
the pump will not overturn. Do
not forget to replace the spout
and water delivery tube onto the
pump outlet.
• Oil motor. The cooler motor in this unit
should be oiled with a few drops of non-
detergent 20/30 weight oil once each year.
The oil ports are located on each side of
the motor (Fig. 8). Motors that have no oil
ports are lifetime oiled at the factory and
require no further oiling for the life of the
unit.
CAUTION: Do not over oil. Over oiling can cause motor burn
out, due to excessive oil getting into motor winding.
Winter Shut Down
• Drain water. Always drain all of the water out of the cooler and
water supply line when not in use for prolonged periods, and
par ticularly at the end of the season. Keep the water line discon-
nected from both the unit and water supply so that it does not
freeze.
Wiring Diagram
White-Com.
Black-Hi
Plain
Blower
Motor
Pump
Motor
Red-Lo
Ribbed-Com.
Green-Ground
Green
Switch
A
B
1
2
3
4
Ribbed-Com.
Plain
Green
Impeller
Remove
Base
Fig. 7
Fig. 8
Oil