
User's Manual
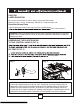

WARNING:Improper alignment of the splitter can cause “kickback” and serious injury.
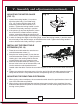
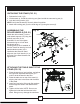
ASSEMBLING THE BLADE GUARD
(Fig. 7, 8 & 9)
V. Assembly and adjustments(continued)
13
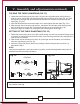
VERIFY THAT THE SAW IS
DISCONNECTED FROM THE OUTLET
BEFORE INSTALLING THE BLADE
GUARD AND SPLITTER ASSEMBLY.
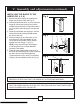
1. Use the handwheel to set the blade to
the maximum height and to set the tilt
to 0° on the bevel scale. Lock the
blade bevel locking knob.
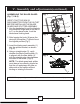
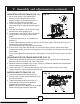
3. Insert the blade guard assembly (1)
into the splitter bracket, as shown.
(Fig. 8)
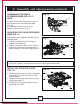
4. Using a straight edge (2), verify
whether the blade guard splitter (3)
is aligned with the saw blade (4),
with the straight edge lying between
the teeth of the blade. (Fig. 9)
NOTE: The blade guard and splitter
must always be correctly aligned so
that the cut workpiece will pass on
either side of the splitter without
binding or twisting to the side.
Fig. 7
Fig. 8
Fig. 9
1
2
4
3
2. After loosing the knob (6),press the
device(5),the splitter (7) should be at
the highest position(Fig.7)
5
6
7