
User Manual


• This torque wrench is a precision instrument intended to be used only to tighten
screws, bolts and nuts to a desired torque. Do not use it as a "nut breaker",
pry bar, or in lieu of a regular ratchet wrench.
• Do not apply torque in excess of the maximum capacity of the wrench.
• Apply load to the grip only, and do not use any handle extension bars. Any
such misuse will result in inaccurate readings, and it may damage the wrench.
• Make sure that you adjust the wrench to the exact torque units your
specifications call for, or you will severely under-torque or over-torque,
causing severe damage to the equipment you are working on.
• Do not disassemble the wrench for
any reason. Highly stressed internal
components may cause severe injury
when released in an unintended
manner.
• The wrench should be re-calibrated
periodically. The calibration of the
wrench should be checked at least
once a year, after any abnormal
handling or overloading, or after
5,000 cycles ("clicks").
TORQUE WRENCH
INSTRUCTION
MANUAL
headline bars
continuation tabs
notes
warnings
READ BEFORE YOU USE
2 3
model no. 058-9642-2 / 058-9643-0 | contact us 1-800-689-9928
9
250
210
60
70
80
0
2
1
50
160
170
23
0
200
240
220
180
190
150
120
110
130
90
100
140
TORQUE
LB-FT
8
continuation tabs
notes
warnings
SAVE THESE INSTRUCTIONS
This manual contains important operating
instructions. Read all instructions and follow
them with use of this product.
4
.
5
1
2
5
1
0
5
3
0
3
5
4
0
0
1
.
5
2
5
8
0
8
5
11
5
1
0
0
1
2
0
11
0
9
0
9
5
7
5
6
0
5
5
6
5
4
5
5
0
7
0
N
E
W
T
O
N
M
E
T
E
R
S
4
.
5
125
105
30
35
40
0
1
.
5
25
80
85
115
100
120
110
90
95
75
60
55
65
45
50
70
NEWTON
METER
S
4
.
5
1
2
5
1
0
5
3
0
3
5
4
0
0
.
5
2
5
8
0
8
5
11
5
1
0
0
1
2
0
11
0
9
0
9
5
7
5
6
0
5
5
6
5
4
5
5
0
7
0
N
E
W
TO
N
M
E
T
E
R
S
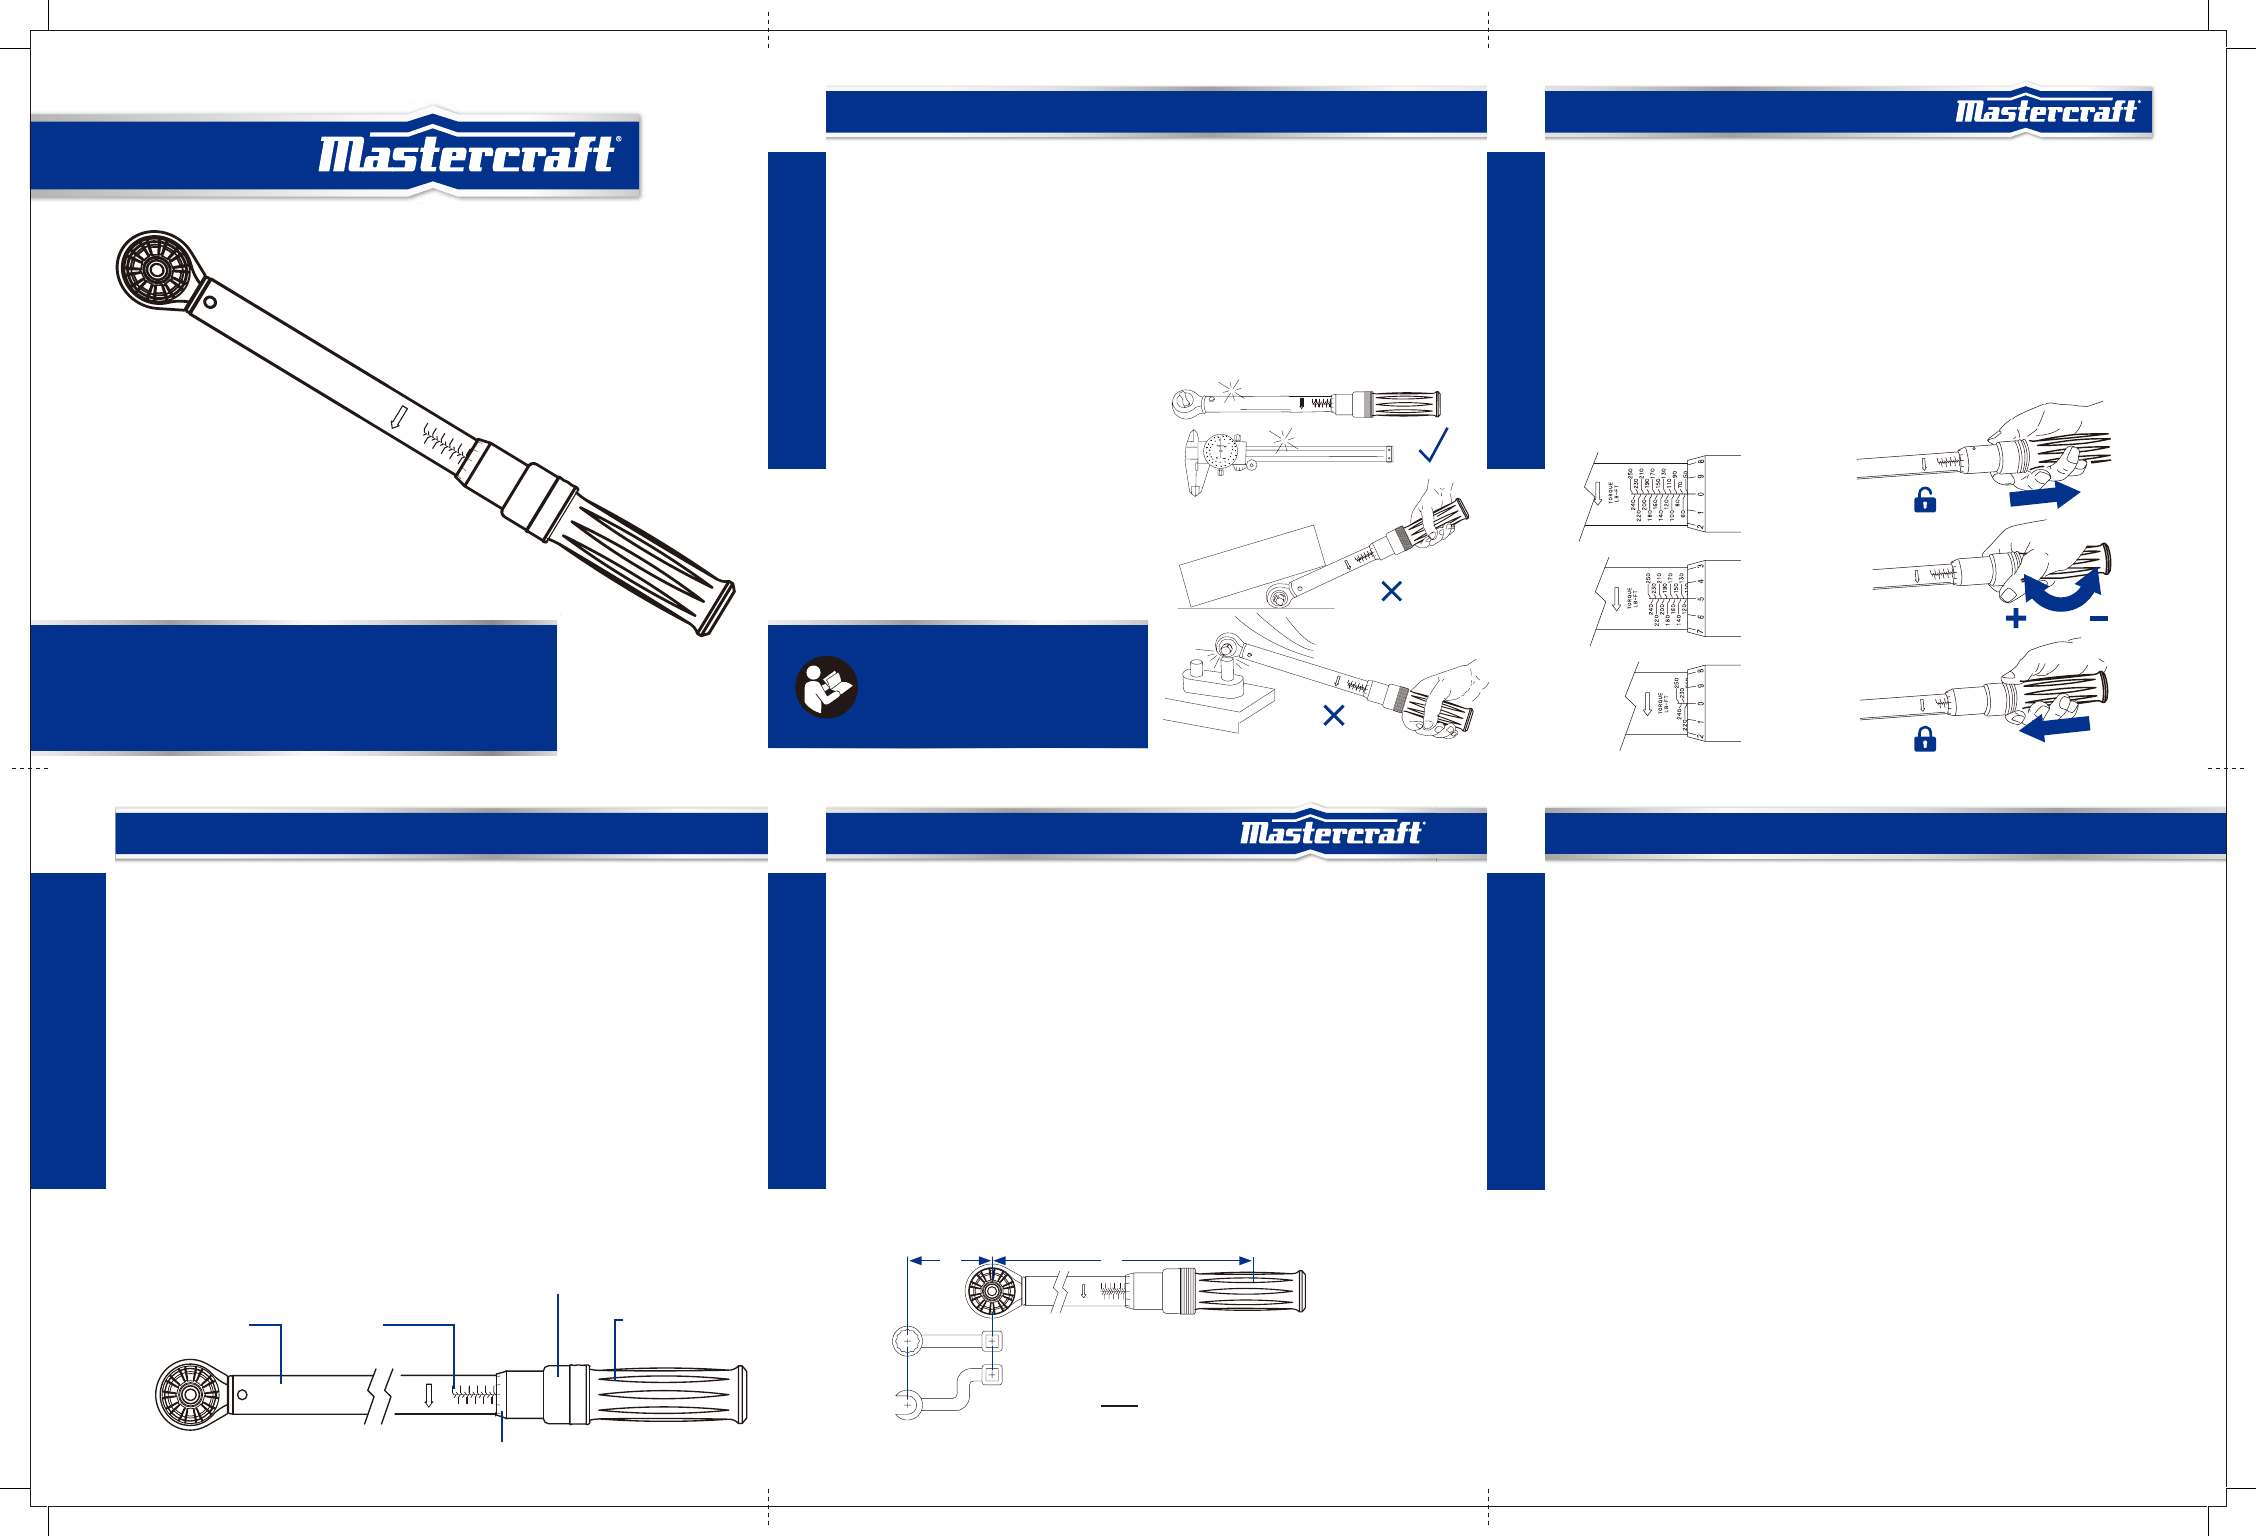
SETTING TORQUE
• Pull and hold the lock knob down.
• Turn the grip in the clockwise direction to increase the torque,
and in the counter-clockwise direction to decrease it.
• The major scales show the amount of torque in both primary and secondary units.
The minor scale shows fine increments in primary units. See examples below.
• Release the lock knob back to lock the grip. The minor scale may move
a small amount to either side of the centre line mark without affecting
the accuracy of your setting.
EXAMPLES OF SETTING
250 FT-LB WRENCH
headline bars
continuation tabs
notes
warnings
headline bars
continuation tabs
notes
warnings
OPERATING INSTRUCTIONS
5 64
model no. 058-9642-2 / 058-9643-0 | contact us 1-800-689-9928 model no. 058-9642-2 / 058-9643-0 | contact us 1-800-689-9928
OPERATING INSTRUCTIONS
SETTING TORQUE
• Make sure that you adjust the wrench to the exact torque units your specifications
call for, or you will severely under-torque or over-torque, causing severe damage
to the equipment you are working on.
• Do not disassemble the wrench for any reason. Highly stressed internal
components may cause severe injury when released in an unintended manner.
•
•
The wrench should be re-calibrated periodically. The calibration of the wrench
should be checked at least once a year, after any abnormal handling or overloading,
or after 5,000 cycles ("clicks").
9
250
210
60
70
80
0
2
1
50
160
170
230
200
240
220
180
190
150
120
110
130
90
100
140
TORQUE
LB-FT
8
Hardened alloy
steel housing
Torque wrench indicates when the preset torque has been
reached by releasing for a few degree of free travel, which
is usually accompanied by an audible "click" signal.
Minor Torque Scale (Convenient reference secondary units scale is located on back side.)
Major Torque
Scale
Pull-adjust-release style lock knob
secures selected torque from accidental
change. Easy to lock and unlock.
Durable
knurled grip
continuation tabs
warnings
IMPORTANT: Before using your Mastercraft torque wrench, read
and understand this owner’s guide.
OPERATING INSTRUCTIONS
50.0 FT-LB
(67.8 NM)
115.5 FT-LB
(156.6 NM)
218 FT-LB
(295.6 NM)
TO
R
Q
U
E
L
B
-
F
T
2
1
0
9
8
19
0
1
80
14
0
9
0
1
3
0
1
7
0
11
0
16
0
1
2
0
1
5
0
1
0
0
8
0
7
0
2
5
0
2
4
0
2
3
0
2
2
0
2
1
0
2
0
0
6
0
5
0
5
0
6
0
2
0
0
2
1
0
2
2
0
2
30
2
4
0
2
5
0
TO
R
Q
U
E
L
B
-
F
T
7
0
80
1
0
0
15
0
12
0
1
6
0
11
0
17
0
1
3
0
9
0
1
4
0
1
8
0
1
9
0
2
0
1
9
8
2
1
0
9
2
1
0
2
4
0
2
3
0
TO
R
Q
U
E
L
B
-
F
T
2
5
0
1
90
2
2
0
2
0
0
18
0
1
7
0
1
6
0
1
50
8
SETTING TORQUE
Unlock
Setting
Torque
Lock
APPLYING TORQUE
• Insert an appropriate socket or drive attachment onto the square drive
of the ratchet and onto the fastener you want to tighten.
• Apply hand pressure to the grip, and ONLY TO THE GRIP. You may support the wrench
at the ratchet head with the other hand to steady it, especially when using long socket
extensions, without appreciably affecting the accuracy of the wrench.
• If, due to the required effort, you need to use both hands, put the other hand on top
of the first hand, never on any other part of the wrench.
• Apply slow and steady pull or push until the wrench momentarily releases, with or without
a distinct "click" sound. Release the pressure right at this point. DO NOT OVER-TORQUE!
WARRANTY INFORMATION
SAFETY WARNING
• Over-torqued or defective fasteners, sockets, as well as the wrench itself, may suddenly
break causing you to lose balance, fall, or to suffer other trauma. Be sure that you have
firm footing, are properly balanced, and if necessary are using appropriate harness,
back support, or other safety device.
MAINTENANCE
• When not in use, adjust the wrench to its lowest reading and store it in a dry and clean location.
• With the exception of the ratchet mechanism, do not lubricate the wrench. The ratchet
mechanism may be lubricated as needed with a few drops of light machine oil.
• Do not use acetone or other solvents to clean the wrench, use window cleaner or denatured
alcohol applied with a clean cloth instead.
• With the exception of the ratchet mechanism, there are no user-serviceable parts. Do not
disassemble the torque wrench for any reason. When service is needed, send the wrench
to the nearest factory-authorized service centre.
CERTIFICATION
• This torque wrench is certified to have been calibrated prior to shipment
to the accuracy of +/- 4% in the clockwise direction.
Made in China
Imported by Mastercraft Canada Toronto, Canada M4S 2B8
USE OF EXTENSIONS
• Extensions that put the centre of the fastener being tightened away from
the centre line of the ratchet drive result in the effective torque being different
from the one shown on the wrench. Consequently, the torque set on the wrench
must be corrected using the formula shown on the below.
4
4.5
0
.
5
1
75
90
110
100
120
80
70
50
30
60
40
521
511
501
85
95
65
45
55
25
35
N E W T O N
M E T E R S
T (E) - Torque applied by extension (desired torque)
T (W) - Torque set on the wrench
T (W) = T (E)
L
L + E
LE
WARRANTY
This Mastercraft product carries a one-year warranty against defects in workmanship and
materials. This product is not guaranteed against wear or breakage due to misuse and/or abuse.
model no. 058-9642-2
model no. 058-9643-0
headline bars
continuation tabs
notes
warnings
Hold drive tang or socket attached to drive tang with one hand. With the other
hand, turn the dial on top of the ratchet head clockwise or reverse clockwise
dependent on the desired ratchet direction. Unless stated otherwise, this ratchet is
calibrated in clockwise direction only.
REVERSING DIRECTION
STORAGE
When stored or not in use, the wrench should be set to 20% of the maximum capacity (50 in-lbs
for 3/8” drive, 50 ft-lbs for 1/2” drive)