
Installation Instructions

a
)
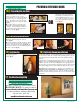
Check your rough opening dimensions.
The rough opening height should equal
the door height plus 2-1/2". The rough
opening width should equal the door
width plus 2".
b
)
Check the opening and both walls
for plumb and square
(
fig.1 &
fig.2
)
.
Make the necessary corrections prior to
installing the door unit. If the opening
is not plumb the door will not hang
correctly.
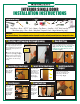
INTERIOR SINGLE DOOR
INSTALLATION INSTRUCTIONS
WARNING
Door Units Are Heavy! Use an adequate number of people to set the unit and prevent injuries or damage to the door.
1
)
Checking and Prepping the Rough Opening
2
)
Door Unit Prep
3
)
Install Hinge Side Hanger
4
)
Install Strike Side Hangers
5
)
Install Opposite Side
Hangers
6
)
Bend Hangers
7
)
Draw Plumb Line
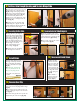
g. 5
g. 6
g. 7
g. 8
g. 9
g. 10
g. 11
g. 1
g. 3 g. 4
Remove the packaging materials from the door. This
includes and banding, boxes, sleeves, and bracing boards
(
fig.3
)
. Leave the door clip installed
in the door at this time for ease of
installation
(
fig.4
)
.
Install one door
hanger flush with
the top of each
hinge
(
fig.5
)
.
Install three more
door hangers on the
strike side of the
jamb directly across
from the locations of
the hinge side
hangers.
(
fig.6
)
.
Flip the door over and install
three more door hangers to each
jamb directly in line with the
first six hangers
(
fig.7
)
.
Using a pliers, bend
the six clips
on the non-hinge
side (applied in
step 5) so that
they are parallel
with the jambs
(
fig.8 & 9
)
.
Draw a plumb
line approxi-
mately 1/2
"
in
from the rough
opening on the
hinge side of the
door
(
fig.10
& 11
)
.
Safety Glasses • Gloves • 48"-72" Level • Hammer • Tape Measure • Screw Gun • 2-1/2" Wood Screws Qty: 3
• Wood Shims
(1pkg.) • Pliers • Chisel • Utility Knife • Carpenter's Pencil • Hanger Hardware Bag (2pkgs.)
REQUIRED TOOLS
g. 2