
Installation Instructions

PREHUNG INTERIOR DOOR
a
)
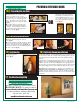
All Mastercraft doors are set up with a 2-1/8"
bore hole set at either a 2-3/8" or a 2-3/4"
backset (depending on door type). Non edge prepped
crossbores are set for a 1" drivepoint latch. This is
done to allow installers to utilize drive point latch
systems, radius plate sytems, or square plate systems
(
fig.29
)
.
b
)
To install the backset as a drivepoint system,
simply follow the lock manufacturers instruction for
converting to a drivepoint. Hammer the drivepoint
into place making sure the angled portion of the
backset faces the jamb
(
fig.30
)
.
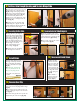
14a
)
Preparing the Lockset
g. 33
g. 30
g. 34
g. 35
15
)
Apply Casing
g. 36
Apply casing to the unit as
desired.
(
fig.36
)
.
Our wallcovering department carries all the quality products you need to finish your new
door. Choose from a complete line of sandpaper, stains and finishing products to give your
project that professional look. Remember, always follow all the manufacturer's finishing
instructions.
1.) Surface must be clean and dry. 2.) Lightly sand and clean door of all dust and debris.
3.) Apply a first coat of oil-based stain, polyurethane, conditioners or primer (oil-based is
required) to all six sides of the door and jamb. 4.) When first coat is dry, lightly sand and
then clean surface. Once the oil-based primer has properly dried, a latex or water based paint
can be applied. 5.) Apply at least one finish coat. Allow ample drying time between coats.
IMPORTANT: Water-based stain, polyurethane or conditioners are not recommended. Only
oil-based stains, polyurethane or conditioners should be used. Apply
a minimum of two coats of sealer to all six sides of the door. Carefully follow all paint
manufactures preparation and finishing instructions. Do not close the door until the paint is
completely dry.
16
)
Finishing Recommendations
g. 29
Revised: 06/2016
The edge prep option on your interior door
will come with a pre-routered pocket for the
crossbore
(
fig.31
)
. The edge prep is bored
1"w x 2-1/4"h at a depth of 1/8" to fit most
factory supplied locksets with no adjustments
needed.
(
fig.32
)
.
17
)
Troubleshooting Help
Questions or Concerns: For guest assistance contact
MASTERCRAFT
®
by sending an email to:
MastercraftDoorHelp@MidwestManufacturing.com
For more information, including troubleshooting
help and videos, please visit:
www.MidwestManufacturing.com
g. 31
g. 32
a
)
Using the manufacturers instructions, install the
lockset
(
fig.33
)
.
b
)
Install the strike plate on the jamb. Our jambs are mortised
for a 1/4" radius strike plate. If the lock manufacturer has
supplied a square plate, mark the outside edge
(
fig.34
)
and
use a chisel to remove the excess wood material from around
the corners of the plate
(
fig.35
)
.
14b
)
Installing the Lockset
OR