
User manual


e U.S. Coast Guard requires a method of re suppression on ev-
ery boat operating within U.S. waterways. MasterCra has made
this an optional installation because of the recognition that needs
can vary considerably. In some instances, consumers may want to
purchase a re extinguisher from an aermarket supplier. Master-
Cra also oers a standard, manual re extinguisher that can be
installed at the time of purchase or at any point aer the fact. In
some models, an automatic re suppression system is available for
the motorbox area. is system operates o a sensor, and there
is no need for the boat operator to manually start it. However, as
with any addition to a boat, there is potential for failure. For that
reason, MasterCra recommends that boats be equipped with a
manual re extinguisher unit as well.
MasterCra further recommends that boat owners include a
check of the re suppression and extinguisher units during the
annual maintenance to be sure that they are always ready for
use. Some units may not require annual checks; refer to the sig-
nage and labeling on the individual units for further guidance.
GPS and Chartplotter
All GPS and chartplotter systems come with extensive instruc-
tion manuals. Please refer to these manuals or the manufactur-
er’s website for details and guidance.
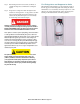
Head
e following information is provided for the head installed in
a MariStar 280 or X-80:
Preparing the head for use:
Step 1: With the seat lid closed, pull the ush handle to open
the slide valve. en push to close. is relieves air
pressure that may be created in the lower holding tank
due to changes in temperature or altitude.
Step 2: Remove the water cap and ll the upper tank until
it reaches about 1 inch (25 mm) below the opening.
Replace the cap.
Step 3: Pull the ush hand to open slide valve.
Step 4: Pour deodorant directly into the lower tank, then close
the slide valve. Do NOT pour deodorant into the bowl
with the slide valve closed.
Step 5: Stroke the air pump about 15 times or until air emits
through the relief valve on the water cap. Do not over-
pressurize the upper tank by covering the relief valve.
Do not let the upper tank pressurize when it is discon-
nected from the lower tank.
In using the toilet:
Step 1: Before each use, with the seat lid closed, pull the ush
handle to open the slide valve, then push to close. is
relieves air pressure that may be created in the lower
holding tank due to changes in temperature or altitude.
Step 2: Pull the ush hand to release waste in the lower tank.
Step 3: Push the ush button to rinse the bowl. Push the ush
hand to close the slide valve.
To empty the holding tank:
Step 1: When the tank level indicator shows “FULL,” or at the
end of an outing, empty the lower tank.
Step 2: Pull up on the rear latch to separate the upper tank
from the lower tank. Carry the lower tank to an autho-
rized waste disposal area or a normal toilet. (DO NOT
DISPOSE WASTE IN ANY LOCATION, INCLUD-
ING NAVIGABLE BODIES OF WATER, WHERE
SUCH DISPOSAL IS ILLEGAL OR CREATES AN
ENVIRONMENTAL HAZARD.)
Step 3: Rotate the discharge spout way from the tank and open
the vent on top of the holding tank. Empty the tank.
Step 4: If water is available, rinse the lower tank before reas-
sembling the portable toilet.
MasterCraft 2009 Owner’s Manual - Page 19-3