
Installation Instructions
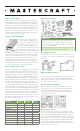

Installation
& Finishing Guide
Glue this piece in behind your header to create a pattern
that fl ows from the face of the moulding around to the
wall. Note on many patterns such as chair rails this piece
will be quite small, so use care when cutting.
How Do I Splice a Moulding?
To span longer lengths, you may have to splice mouldings.
Mitre the joining ends at 45° angles from front to back.
(Fig.5) One member will overlap the other in a scarf joint,
creating a vertical face seam in the fi nished installation.
It is advisable to join moulding pieces over wall stud
(Fig.6) for additional strength.
Climatizing your mouldings.
It is advisable that you “climatize” your mouldings prior to
installation. Mouldings that are made of natural materials
including MDF and other manufactured products can
absorb moisture from many sources such as a damp
garage fl oor. The result of this can be that your mouldings
can shrink after installation leaving gaps that need to be
dealt with. A good solution to this is to “climatize” your
mouldings by stacking them in the room environment which
they are going to be installed in for at least 48 hours prior
to installation. Ideally the mouldings should be separated
to allow air to circulate.
How Do I Install a Moulding?
Install the moulding piece by piece, working your way
around the room, leaving the nail heads exposed to allow
for any repositioning. Avoid nailing the last 2 to 3 inches
of each piece to avoid splitting. In some cases you may
need to predrill your moulding before installation. Nail in
the curved or cove part of the moulding to better hide the
nail holes. Nail mouldings into wood studs or jambs. When
nailing by hand, any good quality fi nishing nail properly
countersunk will work well. Nails should not be more than
1-1/4" longer than the thickness of the baseboard
What Are Crown Mouldings?
Crowns usually run along the wall at the ceiling, (Fig.7)
softening the transition from wall to ceiling while adding a
distinctive look and charm to most rooms. Crowns bridge
the corners by sitting fl at against both the wall and ceiling
at the same time. (Fig.7.1) Crowns are available in a wide
range of profi les and sizes. They can be combined with
other profi les such as baseboards to create the look of
custom millwork without the cost. Crowns may also be
used in mantel and wall trim build-ups.
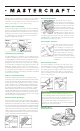
How To Cut A Crown?
As described, crowns do not
lie fl ush against the wall. Cutting
correct 45° mitres is critical. Clamp
two blocks of wood to the mitre box
to hold the moulding in place at
the angle at which it will be installed.
Once blocks are in place, insert
moulding prior to cutting, face out
and upside down (Fig.8). Then cut
your 45° angles with a fi ne tooth saw. To fl at cut crown
mouldings with a compound mitre saw refer to the owner’s
manual that came with your saw.
How To Splice A Crown?
To span longer lengths, you may
have to splice your crowns. Set
your mouldings in a mitre box or
compound mitre saw as described
in previous section. Mitre the joining
ends at 45° angles from front to
back. One piece will overlap the
other in a scarf joint. (Fig.9), creating
a vertical face seam in the fi nished
installation.
How To Cope A Crown?
Trim the moulding in a mitre box at a 45° angle. The
exposed profi le serves as a guideline for the coping
saw. To establish a cutting line, highlight profi le shape
by marking along front edge of profi le with pencil. Cut
along the line at a 45° angle. (Fig.10.) The adjoining
piece of moulding is cut at a 90° angle and butts fl ush
into the corner (Fig.11).
HANDY TIP
When installing crown moulding a helpful tip is to
put up a backing which can be made from cut down
2x4 or any inexpensive wood. You should leave a small
gap between the crown and the backing to allow for
uneven walls and ceilings. The backing saves you
searching for studs and makes for an easier installation.
(See Fig. 7.1 on previous page)
What Do I Need
to Finish the Job?
VERSO
Install the moulding piece by piece, working your way
around the room, leaving the nail heads exposed to allow
for any repositioning. Avoid nailing the last 2 to 3 inches
of each piece to avoid splitting. In some cases, you may
need to pre-drill your moulding before installation. Nail
in the curved or cove part of the moulding to better hide
the nail holes. Nail mouldings into wood studs or jambs.
When nailing by hand, we recommend countersinking
size 6D nails. When using a brad nailer, we recommend
18 gauge nails, and the air compressor should be set to
70-120 PSI. Nails should not be more than 1-1/4” longer
than the thickness of the moulding.
How Do I Install a Moulding?
Climatizing your mouldings.
How Do I Splice a Moulding?
How To Cut A Crown?
How To Splice A Crown?
How To Cope A Crown?
What Do I Need
to Finish the Job?
Installation
& Finishing Guide
Glue this piece in behind your header to create a pattern
that fl ows from the face of the moulding around to the
wall. Note on many patterns such as chair rails this piece
will be quite small, so use care when cutting.
How Do I Splice a Moulding?
To span longer lengths, you may have to splice mouldings.
Mitre the joining ends at 45° angles from front to back.
(Fig.5) One member will overlap the other in a scarf joint,
creating a vertical face seam in the fi nished installation.
It is advisable to join moulding pieces over wall stud
(Fig.6) for additional strength.
Climatizing your mouldings.
It is advisable that you “climatize” your mouldings prior to
installation. Mouldings that are made of natural materials
including MDF and other manufactured products can
absorb moisture from many sources such as a damp
garage fl oor. The result of this can be that your mouldings
can shrink after installation leaving gaps that need to be
dealt with. A good solution to this is to “climatize” your
mouldings by stacking them in the room environment which
they are going to be installed in for at least 48 hours prior
to installation. Ideally the mouldings should be separated
to allow air to circulate.
How Do I Install a Moulding?
Install the moulding piece by piece, working your way
around the room, leaving the nail heads exposed to allow
for any repositioning. Avoid nailing the last 2 to 3 inches
of each piece to avoid splitting. In some cases you may
need to predrill your moulding before installation. Nail in
the curved or cove part of the moulding to better hide the
nail holes. Nail mouldings into wood studs or jambs. When
nailing by hand, any good quality fi nishing nail properly
countersunk will work well. Nails should not be more than
1-1/4" longer than the thickness of the baseboard
What Are Crown Mouldings?
Crowns usually run along the wall at the ceiling, (Fig.7)
softening the transition from wall to ceiling while adding a
distinctive look and charm to most rooms. Crowns bridge
the corners by sitting fl at against both the wall and ceiling
at the same time. (Fig.7.1) Crowns are available in a wide
range of profi les and sizes. They can be combined with
other profi les such as baseboards to create the look of
custom millwork without the cost. Crowns may also be
used in mantel and wall trim build-ups.
How To Cut A Crown?
As described, crowns do not
lie fl ush against the wall. Cutting
correct 45° mitres is critical. Clamp
two blocks of wood to the mitre box
to hold the moulding in place at
the angle at which it will be installed.
Once blocks are in place, insert
moulding prior to cutting, face out
and upside down (Fig.8). Then cut
your 45° angles with a fi ne tooth saw. To fl at cut crown
mouldings with a compound mitre saw refer to the owner’s
manual that came with your saw.
How To Splice A Crown?
To span longer lengths, you may
have to splice your crowns. Set
your mouldings in a mitre box or
compound mitre saw as described
in previous section. Mitre the joining
ends at 45° angles from front to
back. One piece will overlap the
other in a scarf joint. (Fig.9), creating
a vertical face seam in the fi nished
installation.
How To Cope A Crown?
Trim the moulding in a mitre box at a 45° angle. The
exposed profi le serves as a guideline for the coping
saw. To establish a cutting line, highlight profi le shape
by marking along front edge of profi le with pencil. Cut
along the line at a 45° angle. (Fig.10.) The adjoining
piece of moulding is cut at a 90° angle and butts fl ush
into the corner (Fig.11).
HANDY TIP
When installing crown moulding a helpful tip is to
put up a backing which can be made from cut down
2x4 or any inexpensive wood. You should leave a small
gap between the crown and the backing to allow for
uneven walls and ceilings. The backing saves you
searching for studs and makes for an easier installation.
(See Fig. 7.1 on previous page)
What Do I Need
to Finish the Job?
VERSO
What Are Crown Mouldings?