
Specifications


Even if you plan to have annual maintenance work completed by
your MasterCraft service technician, you still should review this sec-
tion and ensure that you have some understanding of what is neces-
sary to keep your boat in top condition.
MasterCraft recommends that your annual–or 100 hour–maintenance
requirements be performed by your MasterCraft dealer. The staff
there has the proper equipment and technical training to best meet
your service needs.
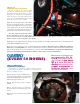
CLEAN THE ENGINE FLAME ARRESTOR
MasterCraft recommends that you have the flame arrestor in-
spected and cleaned by your dealer immediately prior to starting the
boating season. This procedure is extremely important and should be
performed at least once a year.
There may be instances in which you need to check this your-
self. If you have had evidence of material collecting inside the flame
arrestor in the past, you should check yours more often than annu-
ally, particularly after the boat has been sitting for an extended pe-
riod of time. The flame arrestor serves as a trap for airborne materials
that might otherwise enter the engine and cause damage. However, if
your boat sits for a while, small creatures may crawl inside and build
a nest.
Be very careful while removing and while the flame arrestor is
off the engine that absolutely nothing foreign enters the engine through
the area normally covered by the flame arrestor. Any materials enter-
ing can cause damage to your engine and will void your warranty.
Because this process should be completed while the engine is
cool and cannot burn your skin, we recommend you do this before
starting your boat.
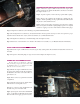
Step 1: Ensure the engine is OFF and the engine safety starting switch
disconnected. Be certain that the throttle/shift control lever is in neu-
tral. The engine must be cool.
Step 2: Carefully remove the flame arrestor from the back of the engine
using a screw driver on the clamp screw.
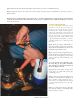
Step 3: Tap the element to dislodge any large embedded dirt and then
gently brush with a soft bristle brush.
Note: Do not use gasoline, steam, caustic cleaning solution,
strong detergent, high-pressure car wash or parts cleaning solvents.
Any of these can harm the cotton filter media, as well as shrink and
harden the rubber end caps.
Step 4: Either spray on K&N air filter cleaner or allow the air filter to
soak in a pan filled with air filter cleaner. Allow the cleaner to work for
approximately 10 minutes.
Step 5: Rinse off the filter with low-pressure water. Tap water is okay.
Always flush from the clean side to the dirty side. This removes the
dirt and does not drive it into the filter.
Step 6: Always dry naturally. After rinsing, shake off all excess water
and let the element dry naturally.