
Owner`s manual


connection with a fire port has been discharged, then you must contact your authorized MasterCraft dealer
to obtain a replacement for the clean agent type of canister. If the dry chemical fire extinguisher has been
discharged, then you may purchase a replacement five-pound dry chemical fire extinguisher that is rated for
Type A, B and C fires from an authorized MasterCraft dealer or from another source.
Fire extinguishers require periodic maintenance. Monthly, each fire extinguisher on your boat should be exam-
ined to be sure that the seals and tamper indicators are not broken or missing. e pressure gauges or indicators, if
applicable, should read in the operable range. ere should be no obvious physical damage, rust, corrosion, leakage
or clogged nozzles. Additionally, if the extinguisher has not been used, it should be weighed annually to assure that
the minimum weight as stated on the label still exists. Any fire extinguisher that has been partially emptied must
be replaced or taken to a qualified fire extinguisher servicing company for recharging.
Considerable additional information regarding the proper use of the fire suppression and extinguishing func-
tions on MasterCraft boats is included in the Boating Safety section of this Owner’s Manual. Be certain to thor-
oughly review and understand that information prior to use of the boat the first time. MasterCraft recommends
that boat owners include a check of the fire suppression and extinguisher units during the annual maintenance to
be sure that they are always ready for use. Some units may not require annual checks;
refer to the signage and labeling on the individual units for further guidance.
GPS and Chartplotter
All GPS and chartplotter systems come with extensive instruction manu-
als. Please refer to these manuals or the manufacturer’s website for details
and guidance.
Head
e following information is provided for the head installed in a 280V or
X-80:
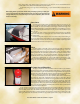
Preparing the head for use:
Step 1: With the seat lid closed, pull the flush handle to open the slide valve. en
push to close. is relieves air pressure that may be created in the lower
holding tank due to changes in temperature or altitude.
Step 2: Remove the water cap and fill the upper tank until it reaches about 1 inch
(25 mm) below the opening. Replace the cap.
Step 3: Pull the flush handle to open slide valve.
Step 4: Pour deodorant directly into the lower tank, then close the slide valve. Do
NOT pour deodorant into the bowl with the slide valve closed.
Step 5: Stroke the air pump about 15 times or until air emits through the relief valve on the water cap. Do
not over-pressurize the upper tank by covering the relief valve. Do not let the upper tank pressur-
ize when it is disconnected from the lower tank.
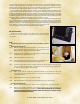
In using the toilet:
Step 1: Before each use, with the seat lid closed, pull the flush handle to open the slide valve, then push
to close. is relieves air pressure that may be created in the lower holding tank due to changes in
temperature or altitude.
Step 2: Pull the flush handle to release waste in the lower tank.
Step 3: Push the flush button to rinse the bowl. Push the flush handle to close the slide valve.
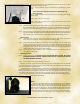
To empty the holding tank:
Step 1: When the tank level indicator shows “FULL,” or at the end of an outing, empty the lower tank.
Step 2: Pull up on the rear latch to separate the upper tank from the lower tank. Carry the lower tank to an
authorized waste disposal area or a normal toilet. (DO NOT DISPOSE WASTE IN ANY LOCATION,
INCLUDING NAVIGABLE BODIES OF WATER, WHERE SUCH DISPOSAL IS ILLEGAL OR CRE-
ATES AN ENVIRONMENTAL HAZARD.)
2011 Owners Manual...Comfort and Convenience...Page 6-3