
Owner`s manual

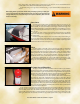

Step 3: Rotate the discharge spout away from the tank and open the vent on top of
the holding tank. Empty the tank.
Step 4: If water is available, rinse the lower tank before reassembling the portable
toilet.
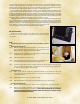
On the CSX 265 head, the following instructions should be followed:
Before operation:
Step 1: Fill the freshwater tank and add deodorant to the holding tank through
the toilet bowl.
Step 2: Turn on the inlet water supply.
Step 3: Turn on the electrical power to the system. (e breaker panel is located in
the head compartment.)
Step 4: Flush water into the system by depressing the flush lever (near the deck) until water starts flowing to
the vacuum pump, which requires approximately 15 seconds. e vacuum pump will run for approxi-
mately 60-to-90 seconds. When the system reaches operation at the vacuum level, it will shut off.
Step 5: Remember that the vacuum pump starts automatically. Shut off the system before servicing and do not
leave the boat with the toilet system breaker on. (e breaker panel is located in the head compartment.)
Never use drain openers, alcohol, solvents, etc., in the system as these are likely to damage the head.
Head operation:
Step 1: To add water to the head before using, raise the flush lever (near the deck) until the desired water
level is reached. Generally, more water is needed only when flushing solids.
Step 2: To flush the head, press the flush lever sharply down to the deck until the contents clear the bowl.
A sharp popping noise is normal when the vacuum seal is broken. Hold the lever down for three
(3) seconds. After flushing, let the lever snap back into position. If the flush lever is accidentally
released before waste clears the bowl, do not flush again until the vacuum pump stops running. A
small amount of water remains in the bowl after flushing.
Step 3: Do not dispose of sanitary napkins or other non-dissolving items in the head. ese items can
cause plugging of the system.
Following operation:
Step 1: Dispose of waste properly. (DO NOT DISPOSE OF WASTE IN ANY LOCATION, INCLUDING
NAVIGABLE BODIES OF WATER, WHERE SUCH DISPOSAL IS ILLEGAL OR CREATES
AN ENVIRONMENTAL HAZARD.)
Step 2: Keep the system clean, using mild detergent or cleaner.
Both types of heads are supplied with in-depth instructions, which will be found in the head and should
be removed and read prior to the first use of the system. Store the instructions with this Owner’s Manual and
other important material regarding the boat.
Use only rapid-dissolve toilet paper with these head systems, and only deodorant specially formulated for
this type of head system. See instructions for details. In the event that anything from the head’s bowl or holding
tank escapes, it should be cleaned as soon as practicable. Failure to clean any spillage may result in unpleasant
odors, mildew, mold and damage to the deck or other areas of the boat. is is not covered under warranty.
See the
Storage & Winterization section of this Owner’s Manual for important information regarding the prepa-
ration of the head for storage.
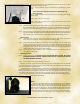
Heater
All MasterCraft models offer a heater option. e heater’s three-position switch
is turned up for ON (LOW), or turned down for ON (HIGH). e center position is
OFF. Warmed air from an electrically powered heater box will be blown from vents
within the boat deck. In regular use, the heater should not require any routine main
-
tenance. However, it is advisable to avoid placing items in front of the vents, par-
ticularly when the heater is in use. e heated air coming out could cause damage.
Never run the heater in a confined space, such as a garage or shop. Fumes from
2011 Owners Manual...Comfort and Convenience...Page 6-4