
Installation Instructions


Page 10
OPERATION
3
1
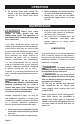
1. Blade 2. Bearing
3. Upper holder 4. Lower holder
4
2
FIG. 4
3
1
2
1. Upper holder 2. Lower holder
3. Wheel
FIG. 5
1. Detach the battery pack from the saw.
2. Detach the side handle.
3. Turn the blade tightening lever counter
clockwise 180°.
4. Making sure that the teeth on the left
side of the tool point towards the rear of
the tool.
5. Position the blade around the wheel and
insert the other side of the blade into
upper holder and the lower holder until
the blade back contact the bottom the
upper and lower holder.
6. Hold the blade in place and turn the blade
tightening lever counter-clockwise 180°,
this places proper tension on the blade.
7. Start and stop the saw two or three time
to make sure the blade runs properly on
the wheel.
WARNING:
Be sure that the blade is
properly seated on the pulleys before starting
the cut.
NOTICE: For new blades replacement,
nd the compatible blade model No.
242-8451 242-8452 in MENARDS store
(sold separately).
REMOVING A SAW BLADE
1. Detach the battery pack from the saw.
2. Detach the side handle.
3. Turn the blade tightening lever clockwise
180° to release the tension on the blade.
4. Carefully remove the blade from the saw.
WARNING:
The blade may kick up
as you released the blade tightening lever. Do
not face to the blade or position the blade to-
ward your body. Keep a safe distance away.
TYPICAL APPLICATION (FIG.6)
Correct Incorrect
FIG. 6
1. To turn the tool ON, push the lock-off
buttonand depress the trigger switch.
2. Keep the blade off the workpiece until the
motor has reached full speed.
3. Start cutting on a surface where the
greatest number of teeth will be in contact
with the workpiece at one time (Fig 6).
4. Place the work steady rest against the
workpiece and lower the moving saw
blade into the cut.