
Installation Instructions


14
e) Before turning the saw ON, carefully rotate
the blade by hand to make sure it does not
wobble.
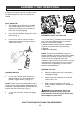
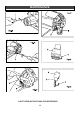
DUST ADAPTOR
1. The Plunge cut circular saw is supplied
with a dust adaptor for a vacuum. It is
attached to the dust port located at the
back end of the fixed guard.
2. Insert the dust adaptor to dust port until it
fastens.(Fig. 4)
3. Use a 1-1/4” tube to connect the dust
adaptor and vacuum to keep work area
clean while cutting.
Fig. 4
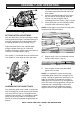
TRIGGER SWITCH
1. To turn the saw ON, push forward the
plunge release (12), then squeeze the
ON/OFF trigger switch (11) (Fig. 5).
NOTE: Please ensure the safety button (18) is
in the ‘lock on’ position before starting the tool,
otherwise, if the safety button is in the ‘lock off’
position the tool will not start. (Fig. 5)
2. To turn the saw OFF, release the trigger
switch.
MATERIALS THAT YOU CAN CUT
The circular saw is a versatile saw that allows
you to cut many different types of materials.
Some of the materials include:
● Wood products such as lumber, hardwood,
plywood, composite board and panelling
● Drywall.
● Masonite and plastic.
NOTE: There are several different types of
blades available. Generally, blades with carbide-
tipped teeth cut better and stay sharp longer.
Tooth count and configuration are also
important. High tooth counts cut slower, and are
best suited for making smooth cuts on thinner
materials such as panelling. Use the correct
blade for your application.
BEFORE YOU CUT
1. Make any adjustments to the saw before
installing the blade.
2. Clearly mark the workpiece to locate the
position of the cut.
3. Hold a smaller workpiece with a vise.
Clamp a larger workpiece to a workbench
or table
DANGER: Any workpiece that is not
adequately clamped in place may come
loose and cause serious injury. Never hold
the workpiece in your hand.
ASSEMBLY AND OPERATING
SAVE THESE INSTRUCTIONS FOR REFERENCE
!
Lock off
Lock on