
Use And Care Manual

Page 10
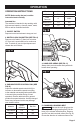
belt and the sander are the same. Close the
lever to tension the belt .
12
10
Fig. D
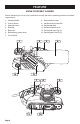
6. BELT CENTERING CONTROL
WARNING
Wear eye protection before
carrying out a belt centering adjustment.
Turn the machine upside down, hold it rmly
with one hand, start the motor and release the
switch immediately after observing tracking of
sanding belt. If abrasive belt runs outward, turn
tracking adjustment knob counter-clockwise
and clockwise if belt runs inward (See Fig. E).
Adjust the belt until the outer edge of the belt is
even with the outer edge of the base-plate (13).
Belt life will be greatly increased by keeping the
tracking adjustment set properly.
Fig. E
13
6
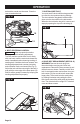
7. DUST BAG (SEE FIG. F)
You must use the dust collection bag provided
to collect the dust produced during sanding.
The dust collection bag plastic bracket slides
down onto the dust outlet on the belt sander.
When the dust collection bag is full, remove and
empty by opening the zip on the dust bag (4).
4
Fig. F
8. DRIVE BELT REPLACEMENT (SEE FIG. G)
WARNING! Remove the main plug from
the socket before carrying out a drive belt
replacement. Remove the three screws (a) and
the belt cover as shown. Carefully cut the drive
belt if not already broken and remove from your
belt sander. Fit your new drive belt around the
large pulley. Then install onto the small pulley
by rotating clockwise and pushing the drive
belt shown around the small pulley at the same
time. The drive belt will be a tight t. Fit the belt
cover and three screws.
5
a
Fig. G
OPERATION