Angle Grinder 241-0788 OPERATOR’S MANUAL CAUTION: To Reduce The Risk Of Injury, User Must Read And Understand Operator’s Manual. Save These Instructions For Future Reference.
TABLE OF CONTENTS General Safety Rules ..........................................................................3-4 Specific Safety Rules ........................................................................4-6 Symbols ................................................................................................7 General Use Statement .........................................................................8 Specifications ...............................................................................
GENERAL SAFETY RULEs PRODUCT SAFETY WARNING Some dust created by power sanding, sawing, grinding, drilling and other construction activities contains chemicals known to the state of California to cause cancer, birth defects or other reproductive harm. Some examples of these chemicals are: ● Lead from lead-based paints; ● Crystalline silica from bricks and cement and other masonry products; ● Arsenic and chromium from chemicallytreated lumber.
GENERAL SAFETY RULE before turning the power tool on.A wrench or a key left attached to a rotating part of the power tool may result in personal injury. • Do not overreach. Keep proper footing and balance at all times.This enables better control of the power tool in unexpected situations. • Dress properly. Do not wear loose clothing or jewelry. Keep your hair, clothing and gloves away from moving parts. Loose clothes, jewelry or long hair can be caught in moving parts.
vibrate excessively and may cause loss of control. • Do not use a damaged accessory. Before each use inspect the accessory such as abrasive wheels for chips and cracks, backing pad for cracks, tear or excess wear, wire brush for loose or cracked wires. If power tool or accessory is dropped, inspect for damage or install an undamaged accessory.
blade or toothed saw blade. Such blades create frequent kickback and loss of control. Additional safety instructions for grinding and cutting-off operations Safety Warnings Specific for Grinding and Abrasive Cutting-Off Operations: • Use only wheel types that are recommended for your power tool and the specific guard designed for the selected wheel. Wheels for which the power tool was not designed cannot be adequately guarded and are unsafe.
SYMBOLS IMPORTANT: Your power tool and its Instruction Manual may contain “WARNING ICONS” (a picture symbol intended to alert you to, and/or instruct you as to how to avoid a potentially hazardous condition). Understanding and heeding these symbols will help you operate your tool better and safer. Shown below are some of the symbols you may see.
GENERAL USE STATEMENT (APPLICATIONS) WARNING Do not attempt to use this product until you thoroughly read and completely understand the instruction manual. Pay close attention to the safety rule, includ- ing Danger, Warnings, and Cautions. WARNING The operation of any tool can result in foreign objects being thrown into your eyes, which can result in severe eye damage.
ELECTRICAL DOUBLE INSULATION Double insulation is a safety concept for electric power tools, which eliminates the need for the usual three-wire grounded power cord. All exposed metal parts are isolated from the internal metal motor components with protecting insulation. Double insulated tools do not need to be grounded. WARNING The double insulated system is intended to protect the user from shock resulting from a break in the tool’s internal wiring.
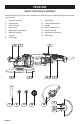
FEATURE KNOW YOUR ANGLE GRINDER Before attempting to use any tool, familiarize yourself with all the operating features and safety requirements. 1. 2. 3. 4. 5. 6. 7. 8. 9. 10. 11. 12. 13. 14. 15.
OPERATION OPERATION INSTRUCTIONS NOTE: Before using the tool, read the instruction book carefully. This tool may cause hand-arm vibration syndrome if its use is not adequately managed. 1. INSTALLING THE AUXILIARY HANDLE (SEE A) You have the option of two working positions to provide the safest and most comfortable control of your angle grinder. The handle is screwed clockwise into either hole on the sides of the gear case. always point to the operator.
OPERATION Fig. B3 Closed Guard Clamping Lever Fig. C2 Working Position (Example) 4. SPINDLE LOCK BUTTON Must only be used when changing a disc. Never press when the disc is rotating! 5. FITTING THE DISCS (SEE C1, C2, C3) Put the inner flange onto the tool spindle. Ensure it is located on the two flats of spindle (See C1). Place the disc on the tool spindle and inner fIange. Ensure it is correctly located.
6. SAFETY ON / OFF SWITCH (SEE D) Your switch is locked off to prevent accidental starting. Depress the lock-off button (yellow arrow) then the on/off switch (white arrow) and release the lock-off button. Your switch is now on. To switch off, just release the on/off switch. Fig. E Fig. D 15o-30o 8. CUTTING 7. TO USE THE GRINDER (SEE E) ATTENTION: Do not switch the grinder on whilst the disc is in contact with the workpiece. Allow the disc to reach full speed before starting to grind.
Fig. F 10. TO REPLACE THE BRUSHES (SEE G) Before any work on the machine itself, pull the mains plug. Remove the screw securing the motor brush cover. Remove the cover, gently lift out, and pull the spade connector free. Hold back the coil spring and slide the worn brush out of the housing, carefully release the spring. Locate the replacement brush, (in the same orientation) whilst again holding back the coil spring.
WORKING HINTS FOR YOUR GRINDER 1.Your angle grinder is useful for both cutting through metals, i.e. for removing screw heads, and also for cleaning / preparing surfaces, i.e. before and after welding operations. 2.Different types of wheel/cutter will allow the grinder to meet various needs. Typically, wheels/ cuttings are available for mild steel, stainless steel, stone and brick. Diamond impregnated discs are available for very hard materials. 3.
TROUBLESHOOTING Although your new angle grinder is really very simple to operate, if you do experience problems, please check the following: 1. If your grinder will not operate check the power at the main plug. 2. If your grinder wheel wobbles or vibrates, check that outer flange is tight, check that the wheel is correctly located on the flange plate. 3. If there is any evidence that the wheel is damaged do not use as the damaged wheel may disintegrate, remove it and replace with a new wheel.
NOTES Page 17
MASTERFORCE® Angle Grinder WARRANTY 90-DAY MONEY BACK GUARANTEE: This MASTERFORCE® brand power tool carries our 90-DAY Money Back Guarantee. If you are not completely satisfied with your MASTERFORCE® brand power tool for any reason within ninety (90) days from the date of purchase, return the tool with your original receipt to any MENARDS ® retail store, and we will provide you a refund – no questions asked.
CUSTOMER SERVICE INFORMATION: Now that you have purchased your tool, should a need ever exist for repair parts or service, simply call 1-888-686-1484. Be sure to provide all pertinent facts when you call or visit.
Afilador angular 241-0788 Para reducir el riesgo de lesiones, el usuario debe leer y comprender el manual del operador. Guarde estas instrucciones para referencia en el futuro.
TABLA DE CONTENIDO Reglas de seguridad generales ....................................................23-24 Símbolos ...........................................................................................25 Declaración de uso general (aplicaciones) .........................................26 Especificacion .....................................................................................26 Eléctrico ..............................................................................................
REGLAS DE SEGURIDAD GENERALESs INSTRUCCIONES DE SEGURIDAD El polvo originado por la utilización de herramientas motorizadas contiene químicos que, según el Estado de California, causan cáncer, defectos congénitos y otros daños reproductivos.
GENERAL SAFETY RULE un elemento protegido del dispositivo de corriente residual (RCD). El uso de un RCD reduce el riesgo de descargas eléctricas. SEGURIDAD PERSONAL • Manténgase alerta, fíjese en lo que está haciendo y use el sentido común cuando utilice una herramienta eléctrica. No use la herramienta cuando esté cansado o se encuentre bajo la influencia de drogas, alcohol o medicamentos. Un momento de distracción al utilizar herramientas eléctricas puede dar lugar a lesiones personales graves.
SÍMBOLOS IMPORTANTE: Su herramienta eléctrica y su Instructivo puede contener “ICONOS DE ADVERTENCIA” (un símbolo en imagen que le advierte, y/o le indica cómo evitar un condición potencialmente peligrosa). Entender y apegarse a estos símbolos le ayudará a operar su herramienta mejor y de manera más segura. A continuación se muestran algunos de los símbolos que puede ver.
DECLARACIÓN DE USO GENERAL (APLICACIONES) No intente usar este producto hasta que lea minuciosamente y entienda por completo el instructivo. Ponga mucha atención a las reglas de seguridad, incluyendo peligro, Advertencias, y Precauciones. La operación de cualquier herramienta puede resultar en que objetos extraños sean arrojados hacia susojos, lo que puede resultar en daño severo a los ojos.
ELÉCTRICO DOBLE AISLAMIENTO El doble aislamiento es un concepto de seguridad para herramientas eléctricas, que elimina la necesidad del cable eléctrico con tierra de tres alambres habitual. Todas las partes de metal expuestas están aisladas de los componentes de metal internos del motor con aislamiento de protección. Las tierras con doble aislamiento no necesitan conectarse a tierra.
CARACTERÍSTICAS CONOZCA SU PULIDORA DE NGULO Antes de intentar usar cualquier herramienta, familiarícese con todas las características de operación y los requerimientos de seguridad. 1. 2. 3. 4. 5. 6. 7. 8.
INSTRUCCIONES DE FUNCIONAMIENTO INSTRUCCIONES DE USO NOTA: Antes de usar la herramienta, lea atentamente el manual de instrucciones. Esta herramienta puede causar síndrome de vibración de mano-brazo si su uso no se administra adecuadamente. 1. INSTALACIÓN DE MANIJA AUXILIAR (VEA LA FIG. A) Tiene 2 posiciones de trabajo que permiten mayor comodidad y mejor control del afilador angular. El mango se enrosca en el sentido de las agujas de un reloj en cualquier agujero de los costados de la caja de engranajes.
OPERACIÓN Fig. B3 Palanca de sujeción de protección cerrada Fig. C1 Posición de operación (ejemplo) 4. BOTÓN DE BLOQUEO DEL EJE Debe utilizarse únicamente durante el cambio del disco. Nunca apretar cuando el disco gira. 5. INSTALACIÓN DE DISCOS (VEA LA FIG. C1, C2, C3) Coloque la brida interior sobre el husillo de la herramienta. Asegúrese que esté ubicada sobre los dos planos del husillo. (Vea La Fig. C1). Coloque el disco sobre el husillo de la herramienta y la brida interior.
OPERACIÓN Fig. C4 Sostenga su afilador con una mano en el mango principal y la otra mano firmemente en el mango auxiliar. Coloque siempre la cubierta de modo que la mayor parte posible del disco expuesto no quede apuntando hacia usted. Esté preparado para una ráfaga de chispas cuando el disco toque el metal. Para controlar mejor la herramienta, sacar material y minimizar la sobrecarga, mantenga un ángulo de unos 15º-30º entre el disco y.
OPERACIÓN ángulo está equipada con una manija de mesa giratoria. Presione la parte trasera del botón de bloqueo (2) en la manija de la mesa giratoria y puede girar la manija 900 a la izquierda o derecha. Después libere el botón de bloqueo. Se escuchará un clic, cuando la manija se bloquee completamente en su lugar. Asegúrese que la manija esté en la posición bloqueada antes de arrancar la amoladora de ángulo. Sólo se permite girar la manija en la condición apagada. Fig. F 10.
CONSEJOS DE TRABAJO PARA SU AFILADOR ANGULAR 1. El afilador angular es útil para cortar metales, por ejemplo, para extraer cabezas de tornillos y para limpiar/preparar superficies, por ejemplo, antes y después de las operaciones de soldadura. 2. Los diferentes tipos de ruedas/herramientas de corte permitirán que el afilador posea varias funciones. Generalmente, las ruedas/herramientas de corte están disponibles para hierro laminado, acero inoxidable, piedra y ladrillo.
SOLUCIÓN DE PROBLEMAS A pesar de que el afilador angular nuevo es realmente muy simple de utilizar, si posee algún problema, consulte los puntos que aparecen a continuación: 1. Si el afilador no funciona, compruebe la alimentación en el tomacorriente. 2. Si la rueda del afilador se tambalea o vibra, compruebe que el reborde exterior esté colocado de forma segura. Compruebe que la rueda esté colocada de forma correcta sobre el reborde. 3.
NOTAS Page 35
GARANTÍA DE Pulidora de Ángulo MASTERFORCE® GARANTÍA DE DEVOLUCIÓN DE DINERO DE 90 DÍAS: Esta herramienta eléctrica de la marca MASTERFORCE® tiene nuestra Garantía de devolución de dinero de 90 DÍAS. Si no está completamente satisfecho con su herramienta eléctrica marca MASTERFORCE® por cualquier razón dentro de noventa (90) días desde la fecha de compra, regrese la herramienta con su recibo original a cualquier tienda al menudeo MENARDS®, y le proporcionaremos un reembolso – sin hacer ninguna pregunta.