LABEL MATRIX8 T E K LY NX ® ® VERSION I N S T A L L A T I O N G U I D E
The information in this manual is not binding and may be modified without prior notice. Supply of the software described in this manual is subject to a user license. The software may not be used, copied or reproduced on any medium whatsoever, except in accordance with this license. No portion of this manual may be copied, reproduced or transmitted by any means whatsoever, for purposes other than the personal use of the buyer, unless written permission is obtained from Braton Groupe sarl.
Table of Contents Chapter 1: Introduction . . . . . . . . . . . . . . . . . . . . . . . . . . . . . . . . . 1-1 Welcome! . . . . . . . . . . . . . . . . . . . . What’s New? . . . . . . . . . . . . . . . LABEL MATRIX Editions . . . . . . . . Other LABEL MATRIX Configurations. . Full Design and PrintPack Versions Single and Network Versions . . . . System Requirements. . . . . . . . . . . . Product Components . . . . . . . . . . . . Viewing the Readme File . . . . . . . . . . . . . . . . . . . . . . . . . .
Introduction 1 Welcome! LABEL MATRIX 8 label design and integration software provides an easy-to-use, user-friendly solution for printing bar code labels and tags to meet compliance standards in any industry.
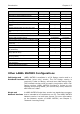
Chapter 1-2 Installation Guide LABEL MATRIX Editions LABEL MATRIX label design software is available in three editions — LM QuickDraw, LABEL MATRIX, and LM PowerPro. (The edition and release number for your software are printed on a label located on the LABEL MATRIX box.) The following table provides an overview of the main features included in each edition.
Introduction Chapter 1-3 FEATURE LM QuickDraw LABEL MATRIX Includes separate Database Editor program Data Grid for viewing database records • LM PowerPro • • • • Directly edit database records in the Data Grid • Printing Windows driver printer support • Support for over 1000 thermal and thermal transfer printers Variable duplicate label count from any origin • • • • • • • Stacked printing ability with multiple labels per page • Reverse the order of pages in a print job • Tools Po
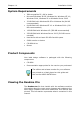
Chapter 1-4 Installation Guide System Requirements • IBM-compatible PC, 486 or better • Microsoft Windows 98 SE, Windows Me, Windows NT 4.0, Windows 2000, Windows XP or Windows Server 2003 • 32 MB RAM with Windows 98 SE or Windows Me (64 MB recommended) • 64 MB RAM with Windows NT 4.
Installing LABEL MATRIX 2 Before Installing • Disable all anti-virus software. • Close all other applications that are currently running. Local administrative privileges are required for proper installation and activation. Contact your system administrator for assistance. Software Installation Note e If you have already downloaded and installed the current LABEL MATRIX Demo, there is no need to install again from the CD.
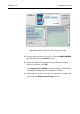
Chapter 2-2 Installation Guide Figure 2-1 LABEL MATRIX 8 CD Opening Screen 2 On the opening screen of the CD, click on LABEL MATRIX 8, and then click the Install button. 3 Select the desired language for the software interface screens, and then click OK. The Preparing to Install screen will appear, followed by the welcome screen for the installation wizard. 4 Follow the on-screen instructions through the wizard until you reach the Destination Folder screen.
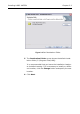
Installing LABEL MATRIX Chapter 2-3 Figure 2-2 Set Destination Folder 5 The Destination Folder screen shows the default installation folder (C:\Program Files\LM8\). It is recommended that you leave the installation location at its default setting. If it is necessary to install to a different location, click the Change button and specify the new location. 6 Click Next.
Chapter 2-4 Installation Guide Figure 2-3 Custom Setup 7 On the Custom Setup screen, you can click on a program feature in the list to view the amount of hard drive space required to install the feature. By default, all listed features (graphic files, Pick List files, conversion utilities, sample labels, etc.) will be installed. To deselect a feature, click its icon and then click This feature will not be available.
Installing LABEL MATRIX Chapter 2-5 When the wizard has completed the install, a message appears to inform you that LABEL MATRIX 8 has been installed successfully. 10 Click Finish to exit the wizard. 11 Do one of the following: • If you are installing a single-user license, you now have the option to run the software for a trial period of 30 days or 100 executions before activating it. When you are ready to activate the software, proceed to the "Activating the Software" section on page 2-7.
Chapter 2-6 Installation Guide Figure 2-4 Migration Tool on the CD 3 If you purchased a Version Upgrade, a Migration Tool instruction sheet will be included in your product box. In addition, it is available in PDF format from the opening screen of the CD by clicking on the Migration Tool item and then clicking the Documents button. Follow the steps provided on the Migration Tool instruction sheet to migrate your license. 4 Activate the software according to the instructions on page 2-7.
Installing LABEL MATRIX Edition Upgrade or Adding Users Chapter 2-7 If you are performing an Edition Upgrade (e.g., from LABEL MATRIX version 8 to LABEL MATRIX PowerPro version 8) or if you are adding users, you do NOT need to reinstall the software. To perform an Edition Upgrade or add users: • If you have purchased an Edition Upgrade or Add-on licenses, your product box will contain a “TEKLYNX Upgrade Program” document that includes a printed label with your product serial number.
Chapter 2-8 Installation Guide Figure 2-5 Activation Wizard 2 Click Activate, and then click Next. The Select Activation Mode screen appears.
Installing LABEL MATRIX Chapter 2-9 Figure 2-6 Select Activation Mode 3 Select from three options for the activation method (Automatic (Internet), Fax/e-mail, or Telephone), and then click Next. 4 Depending on the activation method selected, follow the appropriate steps to complete the activation process. Note Once the software has been activated, the Activation Wizard will no longer appear upon startup, and you will be able to use the software with all features and functionality enabled.
Chapter 2-10 Installation Guide Automatic (Internet) Activation Method 1 Fill in all required fields on the User Registration screen, and then click OK. 2 On the Internet Activation screen, enter the Activation Code you received with the product, and then click Next. A message will appear to inform you that activation was successful. If any problems are encountered, a message will inform you that activation has failed. 3 Click Finish to complete the activation process.
Installing LABEL MATRIX 6 Chapter 2-11 Enter the Response Code provided to you, and then click Next. A message will appear to inform you that activation was successful. If any problems are encountered, a message will inform you that activation has failed. 7 Click Finish to complete the activation process. Telephone Activation Method 1 On the Phone Activation screen, enter the Activation Code you received with the product, and then click Next.
Network Licensing Setup 3 License Management The license management utilities, included with the network (multi-user) packages, allow you to control access to the label design software licenses across the network. Using one of these utilities, you can have many users accessing the label design software at the same time, from anywhere on the network. When users are logged onto the program, their user names will appear in the users list so administrators can keep track of who is using the program.
Chapter 3-2 Installation Guide To install the license management utility: 1 Please note the following BEFORE installing License Manager or License Service: 2 • In most cases, it is recommended that you install the LABEL MATRIX software first, followed by the installation of the license management utility. • The license management utility need only be installed one time in one central location (either on a central server or other shared workstation with all users mapped to it).
Network Licensing Setup Chapter 3-3 Figure 3-1 Network Manager on the CD The install program begins preparations for the LABEL MATRIX Network Utilities setup process (this may take a moment). 4 On the wizard’s Welcome screen, click Next to continue with the installation of the network licensing utilities. 5 Follow the on-screen instructions through the wizard until you reach the Destination Folder screen.
Chapter 3-4 Installation Guide Figure 3-2 Set Destination Folder 6 The Destination Folder screen shows the default installation folder (C:\Program Files\LM8 Network\). It is recommended that you leave the installation location at its default setting. If it is necessary to install to a different location, click the Change button and specify the new location. 7 Click Next.
Network Licensing Setup Chapter 3-5 Figure 3-3 Custom Setup 10 Select the license management utility (or utilities) to install — either License Manager and/or Service Installation (License Service) — and then click Next. 11 On the Ready to Install screen, click Install to begin installing the LABEL MATRIX Network Utilities. 12 When the installation is complete, click Finish to exit the install wizard.
Chapter 3-6 Installation Guide Setting Up a Network Version 1 Install the LABEL MATRIX software according to the "Software Installation" section on page 2-1. 2 Install the license management utility (either License Manager or License Service) according to the "License Management" section on page 3-1. Each workstation requires a mapped letter drive in order to properly access the license management utility on the license server. The root directory of the software (i.e.
Network Licensing Setup Note Chapter 3-7 If the license management utility is not activated, LABEL MATRIX will run in Demo Mode. 9 Start the LABEL MATRIX software again. If the license server install was configured properly, LABEL MATRIX will open without error, and License Manager or License Service should reflect one user accessing the program. If unsuccessful, refer to Appendix A, "Troubleshooting Installation Issues" before continuing.
Chapter 3-8 Installation Guide Using License Manager 1 On the Windows taskbar, go to Start > All Programs > Teklynx > LABEL MATRIX 8 > License Manager. The License Manager dialog box appears displaying a list of users, if any, who are currently using the label design software. Figure 3-4 License Manager 2 Use the following buttons to update and display information in License Manager: Closes License Manager. Updates the display to show the users currently logged into the label design software.
Network Licensing Setup Chapter 3-9 Using License Service Note License Service runs only on Windows NT, 2000, XP and Windows Server 2003 systems. 1 On the Windows taskbar, go to Start > All Programs > Teklynx > LABEL MATRIX 8 > License Service. The License Service dialog box appears displaying a list of users, if any, who are currently using the label design software. Figure 3-5 License Service 2 Click Start to start License Service.
Chapter 3-10 Installation Guide 3 Use the following buttons to update the users list, configure settings, and display information in License Service: Updates the display to show the users currently logged in to the label design software. (The display is automatically updated every few seconds.
Printer Setup 4 LABEL MATRIX supports over 1,000 specialized thermal and thermal-transfer label printers and any printer with a valid Windows driver supplied by the manufacturer. Printer drivers included with this label design software are installed to the program’s Drivers directory when the program is installed. For optimum results when designing and printing labels in this label design software, use one of the high speed printer drivers installed with the program.
Chapter 4-2 Installation Guide Depending on the printer you plan to use, there may be several driver choices available in the software. Printer driver types are designated in the label design software as follows: • (L) Native Driver - Driver is a native software driver, developed specifically for use with this label design software. • (X) Extended Driver - Driver is from an extended driver set that provides support for hundreds of additional printers.
Printer Setup Chapter 4-3 Figure 4-1 Select printer make and model On the Manufacturer/Printer screen, each printer’s installation status is indicated by one of the following icons: Driver is installed on the system and is available for use with the label design software. Driver is supported by the label design software, but is not currently installed. (In most cases the driver can be downloaded from the Web free of charge using the Driver Service Pack utility.
4 Select the manufacturer and printer that you want to use, and click Next. The alias and port selection screen appears. Figure 4-2 Specify alias and port 5 In the Alias box, type a name for the printer. For example, “Warehouse Printer 1” or “Shipping Label Format HP4”. This name will appear in the list of printers in the Printer Setup dialog box. 6 Specify the port to which your printer is physically connected. Note • Local: Select a local port.
Printer Setup Chapter 4-5 7 If printing to a local port (e.g., COM1, LPT1, or USB001), the Enable Windows Print Spooling option is available. Print spooling allows you to send your print jobs to the Windows Print Spooler, which stores each print job until the printer is ready. The advantage of using print spooling is that the label design software will be available for use much quicker immediately following each print job because it is not tied up with the direct printing process. 8 Click Next.
Chapter 4-6 Installation Guide 11 You have now entered all the information needed to attach a printer. To display printer settings after you exit the wizard, click the Change printer setup options check box. 12 Click Finish.
Setting Up System Security 5 The system security feature (available only in LABEL MATRIX and LM PowerPro editions) allows you to restrict users to certain features of the program. You can set up system security by assigning a user ID and password and then selecting the tasks the user may perform. When you restart the program after setting up a user, the security feature is enabled, and all users will be required to log in before using the program.
Chapter 5-2 Note Installation Guide Without Database access, users that have Design access are still allowed to attach databases to labels when assigning a Database origin. • Edit Grid: Giving users access to the Edit Grid function allows them to edit database records directly from the program’s Data Grid. Note that editing is limited to Access and FoxPro databases. • Administration: Allows users to add and modify user security.
Setting Up System Security Chapter 5-3 Figure 5-1 Passwords tab 3 Click Add. The Add User dialog box appears. Figure 5-2 Add Users Note If you are the first user to set up a password, the access options are selected by default.
Chapter 5-4 Installation Guide 4 In the User Name box, type the name that you want the user to enter to access the system. 5 In the Enter Password box, type the user’s password. For security, asterisks (*) appear in place of the characters you type. 6 In the Retype Password box, type the password exactly as you did before. 7 If the check boxes are available, select the functional areas to which this user should have access. 8 Click OK. The user appears in the User List box.
Troubleshooting Installation Issues A The following table lists the most common error messages, issues, and questions encountered when installing the LABEL MATRIX software. For the most current information on installation issues and troubleshooting tips, please reference the LABEL MATRIX FAQs page on the TEKLYNX web site at http://www.teklynx.com/products/labels/labelmatrix_faq.html.
Appendix A-2 Installation Guide (Table continued from previous page) Problem/Question What happens if I lose my Activation Code? I used the Migration Tool utility, but I didn’t write down the Activation Code given at the end. Now what do I do? I installed the software as a trial version at first, and then a few days later I activated it using the code provided in my product box. The problem is, after I activated it, several of the features I was using in the trial version were suddenly not available.
Troubleshooting Installation Issues Appendix A-3 (Table continued from previous page) Problem/Question Solution I lost the CD and I need to re-install the software. What do I do? If you lost the CD and need to re-install, you can download the re-installation files from the TEKLYNX web site at http:// www.teklynx.com/products/labels/ labelmatrix_downloads.html. As long as you are installing to the same PC and have not formatted your hard disk, this is all that is needed to re-install the software.
Appendix A-4 Installation Guide (Table continued from previous page) Problem/Question Solution Where can I find sample labels, training manuals, and tutorials? Sample label design files and compliance label templates can be found in the program’s Sample Labels folder (i.e., C:\Program Files\LM8\Sample Labels). You can also access many helpful resources directly from within LABEL MATRIX by going to the Help menu > Teklynx Online.
Setting the Standard United States France Germany Singapore China Japan 1-414-535-6200 33-562-601-080 49-6103-30026-0 65-6477-7293 86-21-6100-6588 81-45-461-3603 For technical support contact your LABEL MATRIX software reseller. Online support is available free of charge at www.teklynx.com under SUPPORT. Copyright 2006 Braton Groupe sarl. All rights reserved. Printed in the USA 09/06 . TEKLYNX and LABEL MATRIX are registered trademarks of Braton Groupe sarl or its affiliated companies.