
Instructions / Assembly


www.designow.com.au
8 Silkwood Rise Carrum Downs
Vic 3201 Australia
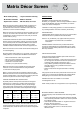
1/4 “
1/2 “
1/4”
1/2 “
3/8“
3/8“
3/4“
1 1/4“
BEAD
BEAD
SCREEN
TIMBER FRAME
TIMBER FRAME
EXPANSION GAP
Oversized hole with screw positioned
at TOP OF HOLE
Recommended
screw or hook positions
MATRIX C-CHANNEL FRAME KIT
The Matrix C-Channel Frame Kit is designed especially for Matrix
Screens. It allows you to attach the panel between or in front of
vertical or horizontal supports, or to the inside of a frame. The kit
makes installation easy, attractive and secure, while allowing the
panel to expand and contract with changes in temperature.
Use a Matrix C-Channel Frame Kit for securing Matrix Screens:
• To the inside of a frame
• To the face of a frame, posts or rails
• Spanning between posts or rails
A Matrix C-Channel Frame Kit is designed to t around a full
screen panel of either 8’ x 4’, 6’ x 4’ or 6’ x 3’ size.
Each kit consists of the following components:
- 2 x long C-channels
- 2 x short C-channels
- 4 x plastic corners
- 10 x galvanized steel at mounting brackets
- 10 x 7/8” long x 1/8” diameter galvanized steel pins
(for securing the panel within the C-channel)
NOTE: Mounting screws are not included in the kit.
TIMBER FRAME
The screen can be mounted using a timber frame with beading.
• Ensure that there is plenty of room for thermal expansion -
you must leave a space of 1/4” along the long edges and
1/2” along the short edges
• Use timber beading at least 1 1/4” in depth to retain the
screen.
• Nail or screw the bead in place to make a back support for
the screen, then position the screen in the frame and t the
bead to hold the screen in place.
• Ensure that the frame is strong enough to withstand the
additional weight and wind loading.
Note: For best results paint all the timber components before
assembly.
ROUTING TIMBER
This option can only be used if timber is routed before the frame
is assembled.
• Rout a slot in the timber frame 3/8” wide The slot has to be
3/4” deep in the base timber to retain the screen and 3/4”
deep along each side. At the top, the slot has to be
1 1/4” deep. This is so that there is enough room for the
decor screen to expand and contract.
• When the sheet is installed in the frame, there should be
1/4” movement in the width of the sheet and 1/2” in the
length for expansion and contraction.
Note: For best results paint or stain the timber before the panel is
installed.
If the panel buckles in the heat, you have not allowed enough
gap for expansion.
• Do not overtighten screws to allow the panel to expand and
contract with changes in temperature.
• For a neater installation paint the screw heads or purchase
colour coded hex head fasteners.
Matrix C-Channel Frame Kit
Tel: (630) 851 2111
Fax: (630) 851 7744
Email: sales@designow.com.au
Figure 1.
Figure. 2
Figure 3.