
User Manual

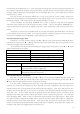
Table Of Contents
- Chapter One Introduction
- Chapter II Technical Specifications
- Chapter IV Panel Operation
- 4.1 Basic operation mode
- 4.2 dynamic test operation
- 4.3 input control
- 4.4 Electronic load operating range
- 4.5 protection function
- 4.6 remote test function
- 4.7 battery discharge test operation
- 4.8 Communication Protocol

19
4.2.7.2 Perform LIST function
Press Shift + 0 to enter menu setting, press ▲ or ▼ key until the load prompts "MENU LIST", press Enter
key to enter, press ▲ or ▼ key until the load prompts "LOAD LIST", press Enter key to enter, press ▲ or ▼ Key
to select the serial number to be executed and press Enter to finish.
Since LIST function and automatic test function share a piece of storage space, if some of the serial number
identification list is defined as automatic test function, when pressing ▲ or ▼ key to select serial number, the
corresponding serial number will be masked.
4.2.8 Automatic test function
Load can perform automatic test function, you can edit up to 8 groups of data, each group can be edited
50 steps, each step can be edited to no-load, constant current, constant voltage, constant power, constant
resistance, short circuit 6 working modes, you can edit the test Compare the current, voltage, power, resistance
4 kinds of parameter types, you can edit the delay test time parameters, the delay time is 0.1 ~ 25.5S taking
into account the speed and accuracy of the test. The load will indicate whether the pass or fail is completed
after an automatic test is completed. If the load fails, an audible alarm will be generated. At the same time, the
keypad supports triggering of the front panel and the TRIGER IN hardware level on the rear panel, and triggers
from the TRIGER OUT port on the rear panel User can edit two trigger modes, level trigger or pulse trigger,
which can be edited to trigger by trigger, fail trigger, test trigger, and trigger trigger.
4.2.8.1 Edit automatic test list
1) Press Shift + 0 to enter the menu setting, press ▲ or ▼ key until the load prompts "MENU AUTO TEST",
press Enter key to enter, press ▲ or ▼ key until the load prompts "EDIT AUTO TEST", press Enter key to enter,
Press ▲ or ▼ key to select the serial number to be set and press Enter to enter the automatic test list edit menu.
2) The load shows "STEP LENG = XX" at this time, prompting you to enter the total test step size. Press the
numeric keys to enter the total step size, and press the Enter key to confirm, the total step should be an integer
from 1 ~ 50.
3) At this moment, the load will display "STEP 1 xxxxx MODE", prompting the working mode selected in the
first step. There are 6 working modes available below. Press ▲ or ▼ to select and press Enter to confirm.
Operating
mode
Prompt information
Description
No load
LOAD OFF MODE”
Compare no-load voltage
Constant
current
“CC MODE”
Can choose to compare the current, voltage, power,
resistance, one of four parameters
Constant
voltage
“CV MODE”
Can choose to compare the current, voltage, power,
resistance, one of four parameters
Constant
power
“CP MODE”
Can choose to compare the current, voltage, power,
resistance, one of four parameters
Set
resistance
“CR MODE”
Can choose to compare the current, voltage, power,
resistance, one of four parameters
Short
circuit
“SHORT MODE”
Compare short-circuit current
4) At this moment, the load shows "STEP 1 TEST xxxx". It prompts to select the data types for comparison.
There are 4 options for current, voltage, power and resistance. Press ▲ or ▼ to select and press Enter to confirm.
If 3) is selected as no-load or short-circuit mode, skip this selection.
5) At this moment, the load display "DELAY TM = xx.xS", prompting the delay time for test and comparison,