
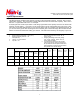
Specifications


9
2.Performallplumbingaccordingtolocalplumbingcodes.
Usea1/2”minimumpipeortubingsizeforthedrainline
Usea3/4”pipeortubingforbackwashflowratesthatexceed7gpmorlengththatexceeds20ft(6m)
3.Anysolderjointsnearthevalvemustbedonebeforeconnectinganypipingtothevalve.Alwaysleaveatleast6"(152
mm)betweenthevalveandjointswhensolderingpipesthatareconnectedtothevalve.Failuretodothiscouldcause
damagetothevalve.
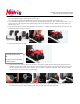
4.Chosetheplumbingconnectorsandinstalltheminthebypassvalve.Removetheredclipandinserttheconnector.Re -
installtheredcliptosecuretheconnector.
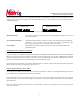
4.Connectthedrainlinetothevalve.
5.Connectthebrinelinefromthevalvetotheaircheck/safetyelbow.Doublechecktomakesureallconnectionsareas
sembledcorrectlyandtheplasticnutistightandsecuretopreventleaks.Removetheclipfromthebrineconnectionon
thevalveandpushthebrinelineintheconnector.Besurethelineispushedincompletely.Pullonthelinetomake
sureitissecure.Re-installthecliptolockthefitting.
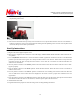
6.Addwateruntilthereisapproximately2"(25mm)ofwaterabovethegridplate.Ifthetankdoesnothaveagrid,addwa
teruntilitisabovetheaircheckinthebrinetank.Add(2)50lb.bagsofsalttothebrinetank.
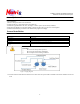
Installation,OperationandMaintenanceManual
MatrixxMX-100,MX-150,MX-200System
Hosebarbfittingfordrain
line.
Besuretouseaholeslamp
tosecuretheline.
Hose barb fitting for drain
line.
Be sure to use a hose clamp
to secure the line.