ENGLISH Matrox® Avio™ Series Avio F120 User Guide 20158-301-0110 2012.12.
Contents About this user guide ..............................................................................................4 Using this guide ........................................................................................................................................4 More information ....................................................................................................................................4 Overview .....................................................................
Audio ....................................................................................................................................... 19 Notes .......................................................................................................................................................19 Digital flat panel information ...............................................................................................................20 Appendix 1 – Connection overview ............................
About this user guide Your Matrox user guide provides information on installing and using your Matrox hardware. Using this guide This guide assumes you’re familiar with basic functions like click, right-click and double-click, and that you’re familiar with the basics of the operating system you’re using. Also, we use the following conventions: Bold for headings and for references to text that appears on-screen. Italics for file names, paths, publication titles, and new terms.
Overview Thank you for purchasing a Matrox Avio product. Avio Series products are KVM (Keyboard Video Mouse) extenders that consist of a transmitter and receiver unit pair connected by a fiber optic cable. These units allow you to operate a computer up to two (2) kilometers away. These products separate your monitors, keyboard, mouse, audio, and USB devices from your computer.
Optional hardware (sold separately) Single-mode transceivers Male-to-male audio cables with mini-stereo (3.5 mm) connectors Male-to-male PS/2 cables USB A to mini-B cables Rack mounting kit Note: To purchase any cables or adapters not included with your Matrox product, see the Matrox online store (shopmatrox.com). For a single-mode transceiver upgrade, contact your sales representative.
Connecting your Avio F120 unit How it works Matrox Avio consists of a transmitter unit and a receiver unit connected by a fiber optic cable. A Matrox Avio environment is made up of four (4) areas defined around its transmitter and receiver units: Host Optical Local Remote Host – Connections between the host system and the transmitter unit. The computer is the only host device. You must connect the main USB and monitors.
Before you begin A Duplex LC-LC fiber optic cable is required. Your Avio units provide the link between your host system and your monitor, keyboard, and mouse. Before you turn on your host system, connect your transmitter unit to your host system; connect your receiver unit to your transmitter unit; connect your monitors, keyboard, mouse, and other devices to your units; then turn on your devices and units.
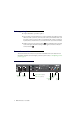
Avio F120 Transmitter – Back PS/2 mouse (host) Line-in (host) Line-out (host) Dedicated USB links (host) PS/2 keyboard (host) DVI-D SL/DL * (host) DVI-D SL (host) VGA+DVI SL/DL * (local) SFP+ 12V DC VGA+DVI SL power input (local) Main USB (host) Avio F120 Receiver – Front PS/2 keyboard (remote) USB HID (remote) PS/2 mouse (remote) Line-in (remote) Microphone (remote) Headphones Line-out (remote) (remote) Matrox Avio Series – User Guide 9
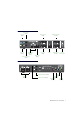
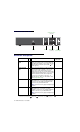
Avio F120 Receiver – Back VGA+DVI SL/DL * (remote) Debug SFP+ VGA+DVI SL 12V DC (remote) power input RX Connector TX Connector descriptions Description Required host connection 12V DC power input 9 9 Connect the 12V DC power supply included with your product to this connector. While the 12V DC power supply is connected to the unit and electrical socket, the power LED ( ) is active (green).
RX TX Connector Description Required host connection Headphones 9 9 Connect your headphones to this connector. This connector supports a 3.5 mm stereo jack. While headphones are connected, the line-out connector remains enabled. Line-in Line-in 9 9 Connect the line-out connector of your computer (host) or of another audio device (local or remote) to this connector. This connector supports a 3.5 mm stereo jack.
RX TX Connector Description Required host connection USB HID 9 9 Connect only your USB HIDs (Human Interface Devices, such as keyboard and mouse) to this connector. A maximum of four (4) USB HIDs can be connected to your receiver unit. TX: Main USB RX: Main USB or Dedicated USB links VGA+DVI SL* 9 9 Connect your analog (VGA) monitor or digital (DVI) single-link monitor to this connector.
Validating your Avio setup Here are some areas you should check to make sure your Avio is properly set up. Before you begin, make sure the power LED ( ) on your Avio units is active (green). Keyboard and mouse The keyboard and mouse on your Avio units must support the same connector type as the connection of your transmitter unit to your host system (PS/2 or USB).
Configuring your Avio product This section describes the Avio OSD (On-Screen Display) menu, options, and controls. With the OSD menu, you can configure and view information on your units. Accessing the OSD menus To view the OSD menu, press the Menu button ( ) on your Avio unit. The menu appears on the screen of the monitors connected to your unit. To navigate through the menu or to select the value of a control, use the Up ( ) and Down ( ) buttons on your unit.
Information This menu allows you to view the following: Connection status of your optical link, the resolution, and the frequency used by your monitor connectors. It also lists if monitors are connected to your transmitter and receiver units. Information on your optical transceiver such as model, part number, serial number, laser wavelength, temperature, and electrical data. Temperature of the main controller of your Avio unit.
EDID Management This menu allows to select which EDID settings are provided to your host system by your transmitter and receiver units. Your Avio product supports two (2) EDID modes: Active – Uses the EDID settings of the monitor on the connector. While using this mode, the EDID settings of the monitor connected to your receiver unit are used first.
Volume This menu allows you to set the volume for the audio output connectors on your unit. You can also mute all audio connectors on your unit. Options This menu allows you to select the language of the OSD (if multiple languages are supported), disable the OSD buttons on your unit, set the transparency level of the menu, and choose to list the temperature in Celsius or Fahrenheit. If you disable the OSD buttons, you can access the OSD menu by quickly pressing [Reset] with the tip of a paperclip.
Product information Specifications Avio F120 Monitors supported Supported resolutions Transmitter Receiver 2 single-link or 1 dual-link 2 single-link or 1 dual-link All single-link DVI and dual-link DVI resolutions Video input connectors 2× DVI-D – Video output connectors 2× DVI-I 2× DVI-I Dimensions 21.59 cm × 4.19 cm × 13.56 cm / 8.5" × 1.65" × 5.
External power supply Input AC voltage range 100 to 240 V AC Input frequency 50-60 Hz Input connector IEC 60320-C14 Output voltage +12 V DC Output connector DIN 4 male (4-pin) with lock Maximum power consumption 30 W Audio Stereo audio 2 channel Bits per sample 24 bits per channel, 2 channel (Left and Right) Sampling rate 96 kHz Audio connector type Stereo crosstalk 3.5 mm stereo audio jacks -80 dB 1 VRMS (2.
Digital flat panel information TMDS® (Transition Minimized Differential Signaling) encoding for DVI connectors DDWG (Digital Display Working Group) compliant DVI connector EDID (Extended Display Identification Data) 1.2 and 1.
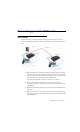
Appendix 1 – Connection overview Optional local Host connections 6 Connection setup Local connections on your transmitter unit are optional and are similar to the ones supported on your receiver unit. DVI-D 1 Connect your monitors to your units. 2 Connect your keyboard and mouse to your units. 3 Connect your fiber optic cable. 4 Connect the USB cable to your host system and your transmitter unit (main USB connection). 5 Connect the power supply of your units.
Notes 22 Matrox Avio Series – User Guide
Appendix 2 – Mounting your units This section provides guidelines for mounting your Avio unit using the rack mounting kit (sold separately). To purchase the rack mounting kit, contact your Matrox sales representative. Rack mounting kit Your Avio unit can be mounted on a 19-inch mounting shelf. You can mount two (2) units side by side on a single shelf. To install your mounting shelf, fasten it to the rack as per your rack’s instructions. Head screws compatible with most rack mounts are provided.
Use a hand screwdriver to carefully tighten each screw. Make sure not to overtighten the screws. Mounting guidelines To prevent damage to your Matrox hardware, read the following guidelines before mounting your Matrox hardware: Make sure not to block the ventilation holes on your unit. Don’t stack anything directly over the unit. Make sure the cables connected to your unit are properly secured and that no tension is applied to them.
Customer support Matrox Web Our Web site has product literature, press releases, technical material, a sales office list, trade show information, and other relevant material. Visit the Matrox Graphics Web site at www.matrox.com/graphics. Technical support Matrox values your business and offers professional support for your Matrox product. If your product was purchased through a Matrox dealer, contact your dealer for product support. This is the quickest and most effective method of technical assistance.
View your warranty information Matrox makes warranty information available on the Matrox site (www.matrox.com/graphics/en/about/warranty). Register your Matrox product Please register online (www.matrox.com/graphics/en/registration) to be eligible for customer support, new product announcements, and information on special offers and upcoming events.
Index A O Avio unit Specifications 18 T OSD 7, 14 Accessing menu Options 14 Technical support U C Customer support 25–26 Environmental Specifications 18 V VESA VGA 19 19 R Registration Firmware package 26 25 12 N 26 Web, Matrox 25 Specifications Avio unit 18 Environmental 18 Power supply 18 Status LEDs 19 W Warranty S L Notes 18 Product information 18–20 Specifications 18 F LEDs User Guide About 4 P Power supply Specifications E 25 14 12 Matrox Avio Series – User Guide
USA FCC Compliance Statement Compliance Remark for the Matrox hardware products supported by this guide This equipment has been tested and found to comply with the limits for a Class A digital device, pursuant to Part 15 of the FCC Rules. These limits are designed to provide reasonable protection against harmful interference when the equipment is operated in a commercial environment.
EUROPE (English) European user’s information – Declaration of Conformity Remark for the Matrox hardware products supported by this guide These devices comply with EC Directive 2004/108/EC for a Class A digital device. They have been tested and found to comply with EN55022/CISPR22 and EN55024/CISPR24. In a domestic environment these products may cause radio interference in which case the user may be required to take adequate measures.
(Italiano) Questo prodotto incorpora la tecnologia di protezione di copia protetta da uno o più brevetti USA e da altri diritti di proprietà intellettuale di Rovi Corporation. È vietato decodificare o disassemblare il prodotto. (Español) Este producto incorpora tecnología de protección de copia que está protegida por patente(s) de EE. UU. y por otros derechos de propiedad intelectual de Rovi Corporation. La ingeniería inversa y el desmontaje están prohibidos.
Copyright © 2012 Matrox Graphics Inc. • (English) All rights reserved. • (Français) Tous droits réservés. • (Deutsch) Alle Rechte vorbehalten. • (Italiano) Tutti i diritti riservati. • (Español) Reservados todos los derechos. Trademarks • Marques déposées • Warenzeichen • Marchi registrati • Marcas registradas Matrox Electronic Systems Ltd. / Matrox Graphics Inc....................................
(English) Disclaimer THE INFORMATION IN THIS GUIDE IS SUBJECT TO CHANGE AT ANY TIME AND WITHOUT NOTICE. Matrox Graphics Inc. reserves the right to make changes in specifications at any time and without notice. The information provided by this document is believed to be accurate and reliable at the time it is written. However, no responsibility is assumed by Matrox Graphics Inc.
Matrox Graphics Inc. 1055 Saint Regis Boulevard Dorval, Quebec, Canada H9P 2T4 North America: 1-800-361-1408 International: (514) 822-6000 Email: graphics@matrox.com Web site: www.matrox.com/graphics Technical support: www.matrox.com/graphics/support To locate the sales office nearest you, visit www.matrox.