
User Manual


23
How to record
1 Connect up to four sources to the SDI inputs on the VS4 card (see Chapter 3,
“Connecting External Devices to Matrox VS4”). Make sure to always
connect a source to Input 1.
¦NoteTo ensure that each recording has the same starting timecode when
starting the source recordings at the same time, the video inputs must be
genlocked to the same reference signal (see “Timecode settings” on page 47).
2 Select a recording mode (see “Recording sessions” on page 25).
3 Specify the VS4Recorder Pro settings as detailed in “Settings” on page 31.
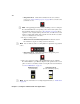
4 In Multi-Cam mode and when using VS4Control, enable/disable a source for
recording by clicking the Source Selection button in the corresponding
source window popover (see “Source window popover” on page 20). Only
enabled sources will start recording when the recording session is initiated.
5 You can start and stop the recording of individual sources at any time during
a recording session:
$ When a source is in the enabled state, click the Source Selection button to
start that source recording.
$ When a source is recording, the Source Recording button is displayed.
Click the Source Recording button to stop recording from that source; this
places that source in a disabled state.
$ When a source is in the disabled state, click the Source Selection button to
re-enable that source.
If you disable the recording, separate video and audio files will be created
for each source recording. An input is automatically enabled for recording
when a source is connected, and when starting the VS4Recorder Pro applica-
tion with the source already connected.
6 To start a recording session:
$ Multi-Cam mode and when using VS4Control Click the Session
Record button on the Control bar (see “Control bar” on page 17) to start
the recording session for all enabled sources.
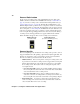
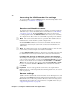
Source enabled Source disabled
Source recording