
Installation Guide


3
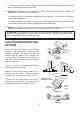
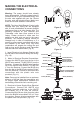
JUNCTION BOX MOUNTING
OPTIONS
Secure the outlet box directly to the building
structure. Use appropriate fasteners and
building materials. The outlet box and its
support must be able to fully support the
moving weight of the fan (at least 45 lbs.).
Use a UL Listed metal outlet box. Do not use
a plastic outlet box.
Figures 1, 2 and 3 are examples of different
ways to mount the outlet box.
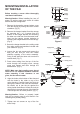
Note: You may need a longer down rod to
maintain proper blade clearance when
installing on a steep, sloped ceiling. (Fig. 3)
To hang your fan where there is an existing
fixture but no ceiling joist, you may need an
installation hanger bar as shown in Fig. 4.
Figure 1
Outlet box
Outlet box
Figure 2
Provide strong
support
Recessed
outlet box
Figure 3
Ceiling
hanger
bracket
ANGLED CEILING
MAXIMUM 24
°
ANGLE
11. To reduce the risk of personal injury, install the supplementary mounting means and use
only the hardware provided with the fan.
12. Warning: TO REDUCE THE RISKS OF FIRE, ELECTRIC SHOCK OR INJURY TO
PERSONS, OBSERVE THE FOLLOWING:
A. Use this unit only in the manner intended by the manufacturer. If you have any questions,
contact the manufacturer.
B. Before installing, servicing or cleaning unit, switch power off at service panel and lock
service panel to prevent power from being switched on accidentally.
13. Warning: To reduce the risk of fire, electrical shock or personal injury, mount to outlet box
marked acceptable for fan support and use screws provided with outlet box.
Outlet box
Figure 4
ATTENTION: Fan includes a 190W limiter to comply with the department of energy 2009
regulation. Lamping this product over 190w will cause this fan to not light. Please use bulbs
with a total wattage under the 190W regulation.