
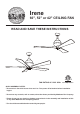
Installation Guide


4
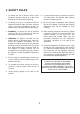
Before touching a screw driver thoroughly
read these instructions.
Warning/Caution: Before installing fan, turn off
power at service panel and check all visible
screws and bolts for tightness.
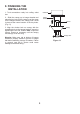
1. Remove the decorative canopy bottom cover
from the canopy by turning the cover counter
clockwise. (Fig. 6)
2. Remove the hanger bracket from the canopy
by removing the 1 of 2 screws from the
bottom of the hanger bracket and loosening
the other one a half turn from the screw head.
Next, turn the canopy counter clockwise to
removing the hanger bracket from the
canopy. (Fig. 6)
3. Secure the hanger bracket to the ceiling outlet
box using screws and washers included with
your outlet box. (Fig. 7)
Ceiling
hanger
bracket
Mounting screws
(supplied with
electrical box)
Hook
Electrical
box
Figure 7
120V Wires
Washers
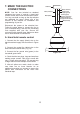
6. HANGING THE FAN
Figure 6
Ceiling
hanger
bracket
Ceiling
canopy
Canopy
cover
Figure 5
Figure 5A
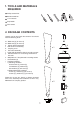
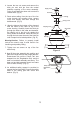
5. ATTACHING THE FAN
BLADES
1. Fasten blade to motor using the screws
supplied. (Fig. 5)
2. Repeat process with other blades. Tighten
each screw and make sure the blade is straight.
NOTE: This fan includes is supplied with two
types of blades installation. Please reference the
important diagram (Fig. 5A) when attaching your
fan blades.
The inner holes are for 3 blades. (for Irene-3)
The outer holes are for 5 blades. (for Irene-5)
Blade
Screw